Last updated on March 9th, 2024
When we are developing some application then that application is having different stages are going to like:
• Development Stage
• Testing Stage
• Production Stage
These stages have different configurations then how will manage these configurations in different files and how to activate a specific stage of the configuration file?
Profiles provide a solution to this problem. This will help manage and activate specific stages of the configuration file of the application.
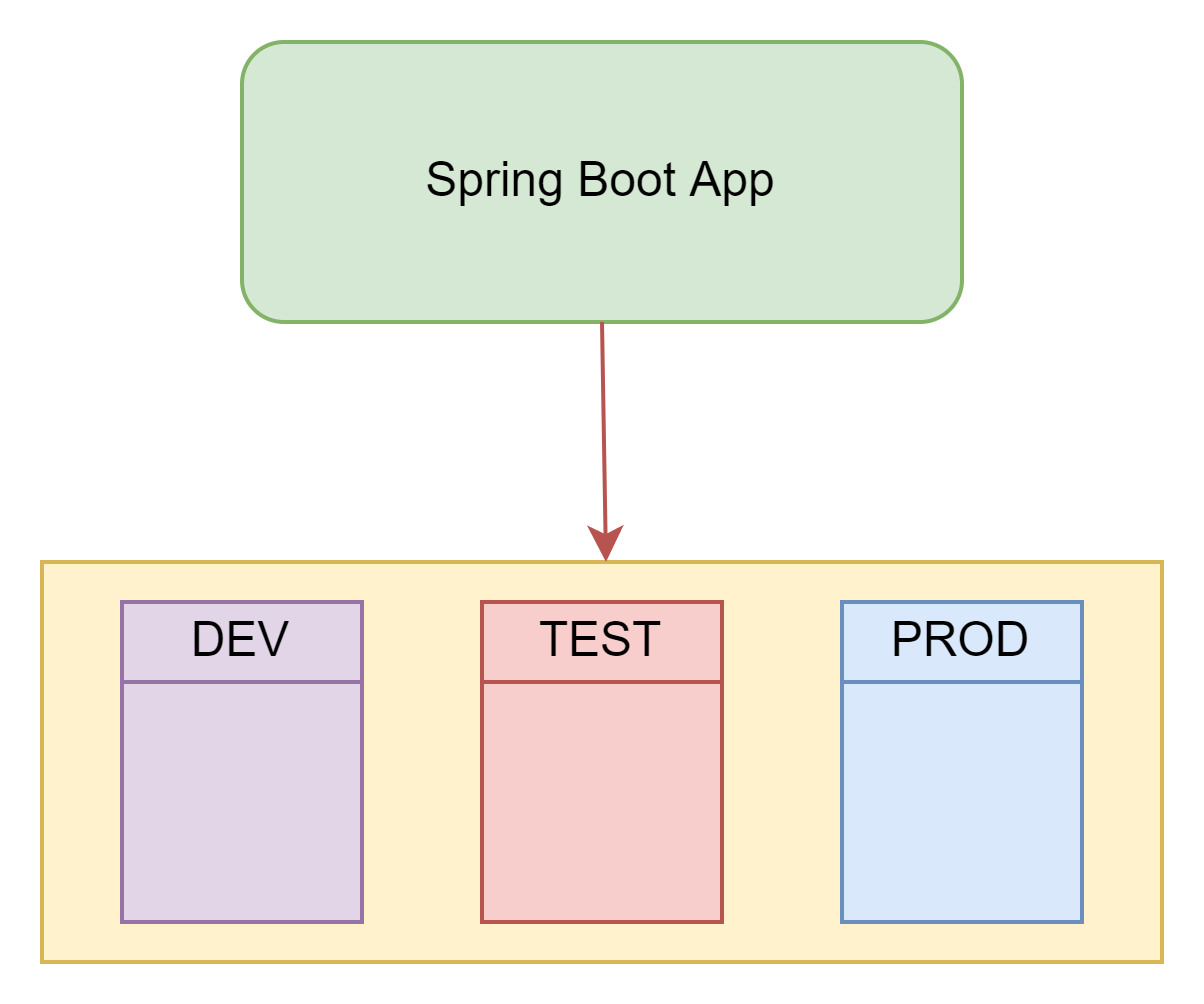
In this Spring Boot application, we created three properties files related to stages of application development:
1. Development Stage of this application(application-dev.properties)
2. Testing Stage of this application(application-qa.properties)
3. Production Stage of this application(application-prod.properties)
In this application, we will activate a specific stage of the application through the application.properties file.
In the application-prod.properties file, we will configure the server port number and message. This server port number configuration identifies that the production stage of the profile is activated and shows the message which is defined in this properties file. When the application after active this properties file then the console is also showing “prod” is active nowIn the application-dev.properties file, we will configure the server port number and message. This server port number configuration identifies that the development stage of the profile is activated and shows the message which is defined in this properties file. When this application after active in this properties file then the console is showing “dev” is active now.
In the application-qa.properties file, we will configure the server port number and message. This server port number configuration identifies that the testing stage of the profile is activated and shows the message which is defined in this properties file. When the application after active this properties file then the console is also showing “qa” is active now.
In the application-prod.properties file, we will configure the server port number and message. This server port number configuration identifies that the production stage of the profile is activated and shows the message which is defined in this properties file. When the application after active this properties file then the console is also showing “prod” is active now.
Development Process:
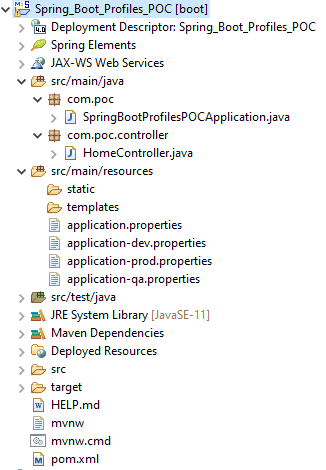
1. Keep eclipse IDE ready(STS Integrated)
2. Create a Spring Boot Starter Project
3. Create application.properties files for stages
4. Create a Rest Controller
5. Run the application
1. Keep eclipse IDE ready(STS Integrated)
Refer to this article How to Create Spring Project in IDE to create Spring Boot Project in Eclipse IDE.
2. Create a Spring Boot Starter Project
Add the following dependencies:
• Spring Web
Maven Dependency
pom.xml:
<?xml version="1.0" encoding="UTF-8"?>

<project xmlns="http://maven.apache.org/POM/4.0.0"

xmlns:xsi="http://www.w3.org/2001/XMLSchema-instance"

xsi:schemaLocation="http://maven.apache.org/POM/4.0.0 https://maven.apache.org/xsd/maven-4.0.0.xsd">

<modelVersion>4.0.0</modelVersion>

<parent>

<groupId>org.springframework.boot</groupId>

<artifactId>spring-boot-starter-parent</artifactId>

<version>2.7.0</version>

<relativePath /> <!-- lookup parent from repository -->

</parent>

<groupId>com.emp</groupId>

<artifactId>Spring_Boot_Profiles_POC</artifactId>

<version>0.0.1-SNAPSHOT</version>

<name>Spring_Boot_Profiles_POC</name>

<description>Demo project for Spring Boot</description>

<properties>

<java.version>16</java.version>

</properties>

<dependencies>

<dependency>

<groupId>org.springframework.boot</groupId>

<artifactId>spring-boot-starter-web</artifactId>

</dependency>

<dependency>

<groupId>org.springframework.boot</groupId>

<artifactId>spring-boot-starter-test</artifactId>

<scope>test</scope>

</dependency>

</dependencies>

<build>

<plugins>

<plugin>

<groupId>org.springframework.boot</groupId>

<artifactId>spring-boot-maven-plugin</artifactId>

</plugin>

</plugins>

</build>
</project>
3. Create application.properties files for stages
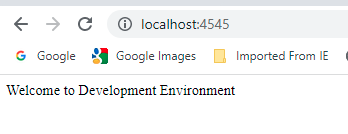
application-dev.properties:
server.port=4545
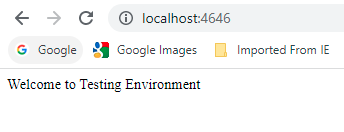
spring.profile.message=Welcome to Development Environmentapplication-qa.properties:
server.port=4646
spring.profile.message=Welcome to Testing Environment
application-prod.properties:
server.port=4444
spring.profile.message=Welcome to Production Environment
application.properties:
spring.profiles.active=dev→ spring.profiles.active=____ is activating your properties file configuration.
4. Create a Rest Controller
HomeController.java:
package com.poc.controller;

import org.springframework.beans.factory.annotation.Value;

import org.springframework.web.bind.annotation.GetMapping;

import org.springframework.web.bind.annotation.RestController;

@RestController
public class HomeController {

@Value(value="${spring.profile.message}")
private String msg;

@GetMapping("/")
public String getMsg() {
return msg;

    }
}
→ @Value is used for fetching value from the application.properties file.
5. Run the application
Type this URL http://localhost:4545 on the browser.
We are activating the application-qa.properties file for this we can type spring.profiles.active=qa in the application.properties file. After that, run the project. Then see your console log.
Type this URL http://localhost:4646 on the browser.
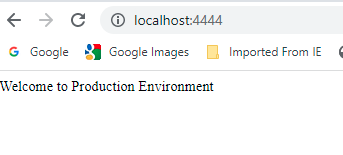
We are activating the application-prod.properties file for this we can type spring.profiles.active=prod in the application.properties file. After that, run the project. Then see your console log.
Type this URL http://localhost:4444 on the browser.
Conclusion:
This topic is explained What are the Profiles? How to use Profiles in the Spring Boot project?