Last updated on March 9th, 2024
In this topic, we will create a Spring Boot Project in STS IDE. We will learn to create a Spring Boot Project and Run it step-by-step in Eclipse.
Table of contents:
1. How to create a Spring Boot Project in STS(Spring Tool Suite) IDE?
2. Project Structure of Spring Boot Project STS IDE
3. How to run a Spring Boot Project in STS(Spring Tool Suite) IDE?
4. Conclusion
1. How to create a Spring Boot Project in STS IDE?
These are the following steps for creating a Spring Boot Project in STS(Spring Tool Suite) IDE:
1. Click on the File menu
2. Click on the New
3. Select Spring Starter Project
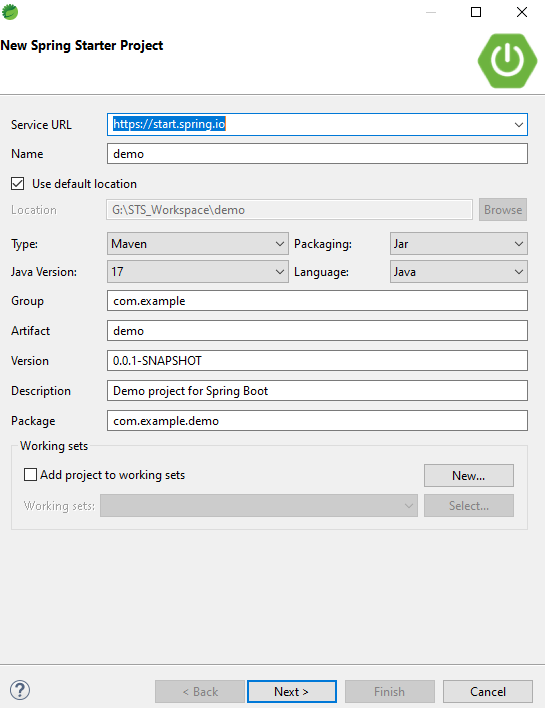
4. Enter the Project Name etc. and then click the Next Button
5. Select the Spring Boot Version and Select Dependency Library for the project.
6. Click on the Finish button then the project is successfully created.
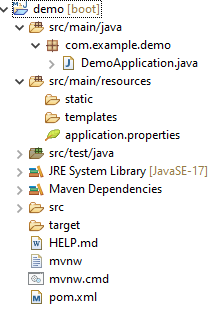
2. Project Structure of Spring Boot Project in STS IDE
This image shows the project structure of the Spring Boot project STS(Spring Tool Suite) IDE:
Maven Dependency
pom.xml:
<?xml version="1.0" encoding="UTF-8"?>
<project xmlns="http://maven.apache.org/POM/4.0.0" xmlns:xsi="http://www.w3.org/2001/XMLSchema-instance"
	xsi:schemaLocation="http://maven.apache.org/POM/4.0.0 https://maven.apache.org/xsd/maven-4.0.0.xsd">
	<modelVersion>4.0.0</modelVersion>
	<parent>
		<groupId>org.springframework.boot</groupId>
		<artifactId>spring-boot-starter-parent</artifactId>
		<version>2.7.7</version>
		<relativePath/> <!-- lookup parent from repository -->
	</parent>
	<groupId>com.example</groupId>
	<artifactId>demo</artifactId>
	<version>0.0.1-SNAPSHOT</version>
	<name>demo</name>
	<description>Demo project for Spring Boot</description>
	<properties>
		<java.version>17</java.version>
	</properties>
	<dependencies>
		<dependency>
			<groupId>org.springframework.boot</groupId>
			<artifactId>spring-boot-starter-web</artifactId>
		</dependency>
		<dependency>
			<groupId>org.springframework.boot</groupId>
			<artifactId>spring-boot-starter-test</artifactId>
			<scope>test</scope>
		</dependency>
	</dependencies>
	<build>
		<plugins>
			<plugin>
				<groupId>org.springframework.boot</groupId>
				<artifactId>spring-boot-maven-plugin</artifactId>
			</plugin>
		</plugins>
	</build>
</project>
SpringBootApplication class:
package com.example.demo;
import org.springframework.boot.SpringApplication;
import org.springframework.boot.autoconfigure.SpringBootApplication;
@SpringBootApplication
public class DemoApplication {
	public static void main(String[] args) {
		SpringApplication.run(DemoApplication.class, args);
	}
}
3. How to run a Spring Boot Project in STS IDE?
Right-click on this SpringBootAppliction class(automatically generated ) of this project then click on Run As and then click on Java Application. Now the project is running successfully. See the output console embedded tomcat server port 8080 is started.
4. Conclusion
In this topic, we learned about How to Create a Spring Boot Project in the STS(Spring Tool Suite) IDE and Run a Spring Boot Project in the STS IDE.