Last updated on March 9th, 2024
Suppose we have Rest API services and we have to give these Rest API services to someone for the purpose of consuming. How we will provide each API service explanation to the consumers:
• What is an API URL?
• What is the type of API?
• What are the parameters of the JSON data send or get the response of the JSON?
For this problem, we can make a word document of an Api explanation for the consumer but it is time-consuming. Because it is a lot of manual work for the developers and also consumers of Api for understanding.
Swagger is providing a solution to these problems. It is providing complete details of our API using a common language that can be easily understandable and interactable with consumers. It is an automatically generated document of our API services. It can be easily understandable for machines and humans.
Swagger Dependency
<dependency>
<groupId>io.springfox</groupId>
<artifactId>springfox-boot-starter</artifactId>
<version>3.0.0</version>
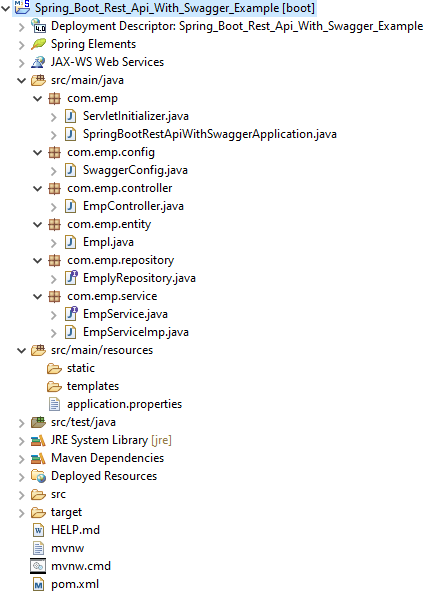
</dependency>In this example of the application, we will create one Java Bean which is annotated with @Entity annotation to create the table in the database. We will create one repository interface which is the extended JpaRepository for persistence operations. We will create one service interface and create one service class that implements the service interface. We will create one class for Swagger Configuration. We will create one controller class which contains request handler methods and give us a response. The controller class is delegating the service layer to the persistence layer and then gets back to provide output.
Development Process:
1. Keep eclipse IDE ready(STS Integrated)
2. Create a Spring Boot Starter Project
3. Define Database Connection in the application.properties file
4. Create Entity class
5. Create a Repository
6. Create a Service
7. Create a Rest Controller class
8. Create SwaggerConfig Class
9. Run the Project
10. Conclusion
1. Keep eclipse IDE ready(STS Integrated)
Refer to this article How to Create Spring Project in IDE to create Spring Boot Project in Eclipse IDE.
2. Create a Spring Boot Starter Project
Select the war packaging for the project. Add the following dependencies:
• Spring Web
• Spring Data JPA
• Mysql Driver
Maven Dependency
pom.xml:
<?xml version="1.0" encoding="UTF-8"?>
<project
	xmlns="http://maven.apache.org/POM/4.0.0"
	xmlns:xsi="http://www.w3.org/2001/XMLSchema-instance"
	xsi:schemaLocation="http://maven.apache.org/POM/4.0.0 https://maven.apache.org/xsd/maven-4.0.0.xsd">
	<modelVersion>4.0.0</modelVersion>
	<parent>
		<groupId>org.springframework.boot</groupId>
		<artifactId>spring-boot-starter-parent</artifactId>
		<version>2.7.0</version>
		<relativePath />
		<!-- lookup parent from repository -->
	</parent>
	<groupId>com.emp</groupId>
	<artifactId>Spring_Boot_Rest_Api_With_Swagger_Example</artifactId>
	<version>0.0.1-SNAPSHOT</version>
	<packaging>war</packaging>
	<name>Spring_Boot_Rest_Api_With_Swagger_Example</name>
	<description>Demo project for Spring Boot</description>
	<properties>
		<java.version>8</java.version>
	</properties>
	<dependencies>
		<dependency>
			<groupId>org.springframework.boot</groupId>
			<artifactId>spring-boot-starter-data-jpa</artifactId>
		</dependency>
		<dependency>
			<groupId>org.springframework.boot</groupId>
			<artifactId>spring-boot-starter-web</artifactId>
		</dependency>
		<dependency>
			<groupId>io.springfox</groupId>
			<artifactId>springfox-boot-starter</artifactId>
			<version>3.0.0</version>
		</dependency>
		<dependency>
			<groupId>org.springframework.boot</groupId>
			<artifactId>spring-boot-starter-tomcat</artifactId>
			<scope>provided</scope>
		</dependency>
		<dependency>
			<groupId>org.springframework.boot</groupId>
			<artifactId>spring-boot-starter-test</artifactId>
			<scope>test</scope>
		</dependency>
		<dependency>
			<groupId>com.h2database</groupId>
			<artifactId>h2</artifactId>
			<scope>runtime</scope>
		</dependency>
	</dependencies>
	<build>
		<plugins>
			<plugin>
				<groupId>org.springframework.boot</groupId>
				<artifactId>spring-boot-maven-plugin</artifactId>
			</plugin>
		</plugins>
	</build>
</project>
3. Define Database Connection in the application.properties file
server.port=4444
spring.datasource.url=jdbc:h2:mem:test
spring.datasource.username=sa
spring.datasource.password=
spring.jpa.show-sql=true
spring.jpa.properties.hibernate.dialect=org.hibernate.dialect.H2Dialect
spring.jpa.hibernate.ddl-auto= update
spring.h2.console.enabled=true
4. Create Entity class
Empl.java:
package com.emp.entity;
import javax.persistence.Entity;
import javax.persistence.GeneratedValue;
import javax.persistence.GenerationType;
import javax.persistence.Id;
import javax.persistence.Table;

@Entity
@Table(name = "emp")
public class Empl {
	@Id
	@GeneratedValue(strategy = GenerationType.IDENTITY)
	private Integer id;
	private String firstName;
	private String lastName;
	private String emailId;

	public Empl() {

	}

	public Integer getId() {
		return id;
	}

	public void setId(Integer id) {
		this.id = id;
	}

	public String getFirstName() {
		return firstName;
	}

	public void setFirstName(String firstName) {
		this.firstName = firstName;
	}

	public String getLastName() {
		return lastName;
	}

	public void setLastName(String lastName) {
		this.lastName = lastName;
	}

	public String getEmailId() {
		return emailId;
	}

	public void setEmailId(String emailId) {
		this.emailId = emailId;
	}
}
5. Create a Repository
EmplyRepository.java:
package com.emp.repository;
import org.springframework.data.jpa.repository.JpaRepository;
import com.emp.entity.Empl;

public interface EmplyRepository extends JpaRepository<Empl, Integer> {

}
6. Create a Service
EmpService.java:
package com.emp.service;
import java.util.List;
import com.emp.entity.Empl;

public interface EmpService {
	Empl save(Empl empl);
	List<Empl> getAll();
	Empl getEmpById(Integer empId);
	void delete(Empl empl);
}
EmpServiceImp.java:
package com.emp.service;
import java.util.List;
import java.util.Optional;
import org.springframework.beans.factory.annotation.Autowired;
import org.springframework.stereotype.Service;
import com.emp.entity.Empl;
import com.emp.repository.EmplyRepository;
@Service
public class EmpServiceImp implements EmpService {
@Autowired
EmplyRepository emplyRepository;
@Override
public Empl save(Empl emy) {
return emplyRepository.save(emy);
}
@Override
public List<Empl> getAll() {
return emplyRepository.findAll();
}
@Override
public Empl getEmpById(Integer emyId) {
Optional<Empl> empl=emplyRepository.findById(emyId);
Empl empy=null;
if(empl.isPresent()) {
empy=empl.get();
}else {
throw new RuntimeException("Empy is not Found"+emyId);
}
return emy;
}
@Override
public void delete(Empl emy) {
emplyRepository.delete(emy);
}
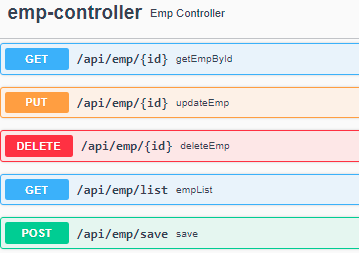
}7. Create a Rest Controller class
EmpController.java:
package com.emp.controller;
import java.util.LinkedHashMap;
import java.util.List;
import java.util.Map;
import org.springframework.beans.factory.annotation.Autowired;
import org.springframework.http.ResponseEntity;
import org.springframework.web.bind.annotation.CrossOrigin;
import org.springframework.web.bind.annotation.DeleteMapping;
import org.springframework.web.bind.annotation.GetMapping;
import org.springframework.web.bind.annotation.PathVariable;
import org.springframework.web.bind.annotation.PostMapping;
import org.springframework.web.bind.annotation.PutMapping;
import org.springframework.web.bind.annotation.RequestBody;
import org.springframework.web.bind.annotation.RequestMapping;
import org.springframework.web.bind.annotation.RestController;
import com.emp.entity.Empl;
import com.emp.service.EmpService;

@RestController
@RequestMapping("/api/emp")
public class EmpController {
	@Autowired
	EmpService empService;
	@GetMapping("/list")
   public List<Empl> empList(){
	return empService.getAll();

   }
	@PostMapping("/save")
	public Empl save(@RequestBody Empl emp) {
		return empService.save(emp);
	}
	@GetMapping("/{id}")
	public ResponseEntity<?> getEmpById(@PathVariable Integer id) {
		return ResponseEntity.ok(empService.getEmpById(id));
	}

	@PutMapping("/{id}")
	public ResponseEntity<?> updateEmp(@PathVariable Integer id,@RequestBody Empl emp){
		Empl updateEmp=empService.getEmpById(id);
		updateEmp.setFirstName(emp.getFirstName());
		updateEmp.setLastName(emp.getLastName());
		updateEmp.setEmailId(emp.getEmailId());
		return  ResponseEntity.ok(empService.save(updateEmp));
	}

	@DeleteMapping("/{id}")
	public ResponseEntity<?> deleteEmp(@PathVariable Integer id){
		Map<String,Boolean> map=new LinkedHashMap<String,Boolean>();
		Empl deleteEmp=empService.getEmpById(id);
		empService.delete(deleteEmp);
		map.put("deleted", Boolean.TRUE);
		return ResponseEntity.ok(map);
	}
}
8. Create SwaggerConfig Class
SwaggerConfig.java:
package com.emp.config;
import org.springframework.context.annotation.Bean;
import org.springframework.context.annotation.Configuration;
import org.springframework.web.servlet.config.annotation.EnableWebMvc;
import springfox.documentation.builders.PathSelectors;
import springfox.documentation.builders.RequestHandlerSelectors;
import springfox.documentation.spi.DocumentationType;
import springfox.documentation.spring.web.plugins.Docket;

@Configuration
@EnableWebMvc
public class SwaggerConfig {

  @Bean
  public Docket api() {
    return new Docket(DocumentationType.SWAGGER_2)
      .select()
      .apis(RequestHandlerSelectors.any())
      .paths(PathSelectors.any())
      .build();
  }
}
→ A Docket bean is defined and uses its select() method to get an instance of an ApiSelectorBuilder. ApiSelectorBuilder we can configure the endpoints exposed by the Swagger.
→ After the Docket bean is defined, its select() method returns an instance of ApiSelectorBuilder, which gives a way to control the endpoints exposed by the Swagger.
→ Using the RequestHandlerSelectors and PathSelectors we can configure the predicates for the selection of the RequestHandlers.
9. Run the Project
Right-click on the project’s SpringBootApplication class (SpringBootRestApiWithSwaggerApplication .java) then clicks on Run as Java Application.
To verify the h2 database type this URL http://localhost:4444/h2-console on the browser.
To verify the Swagger UI of API http://localhost:4444/swagger-ui/index.html on the browser.
To check the JSON format of API http://localhost:4444/v2/api-docs on the browser. You can also test from the postman to get the JSON format of the API.
10. Conclusion
This topic is explained What is a Swagger How to use Swagger in the Spring Boot Rest API application? What is the benefit of Swagger?