Last updated on March 9th, 2024
In this topic, we will how to use Spring Boot with JPA entity class. We will create a Spring Boot application that creates a Table in the Database through Java code( JPA Entity class). If we are creating a table in the created database through Java Bean then we have annotated the Java Bean class with the help of @Entity annotation avoid to creating with manual table on that database.
JPA: The Java Persistence API (JPA) makes it easier to make Java persistence and provides an object-relational mapping approach that lets you declaratively define how to map Java objects to relational database tables in a standard.
Entity Class: An entity class represents a table in a relational database. In this Spring Boot application, we are using the H2 Database.
H2 Database: H2 is the RDMS(Relational Database Management System)written in the Java programming language. It is embedded in the Java applications or runs in the client-server model to make rapid applications for database operation.
Table of content
1. Creating a Spring Boot Starter Project
2. Keep Eclipse IDE ready
3. Configuring Database
4. Creating a JPA Entity class
5. Creating a JPA Repository
6. Creating a Service
7. Inserting Records
8. Run the Spring Boot Project
1. Creating a Spring Boot Starter Project
Creating a Spring Boot Project for this implementation. We are creating from this Spring Initializer.
Select the following dependencies:
• Spring Web
• Spring Data JPA
• H2 Database
2. Keep Eclipse IDE ready
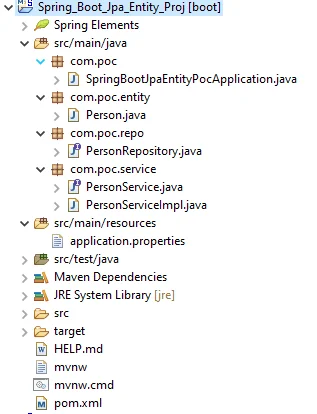
We are importing this create Spring Boot project in Eclipse IDE.
Project Structure of Spring Boot with JPA Entity
Maven Dependency
pom.xml
<?xml version="1.0" encoding="UTF-8"?>
<project
xmlns="http://maven.apache.org/POM/4.0.0" xmlns:xsi="http://www.w3.org/2001/XMLSchema-instance"
	xsi:schemaLocation="http://maven.apache.org/POM/4.0.0 https://maven.apache.org/xsd/maven-4.0.0.xsd">
	<modelVersion>4.0.0</modelVersion>
	<parent>
		<groupId>org.springframework.boot</groupId>
		<artifactId>spring-boot-starter-parent</artifactId>
		<version>2.6.3</version>
		<relativePath/> <!-- lookup parent from repository -->
	</parent>
	<groupId>com.poc</groupId>
	<artifactId>Spring_Boot_Jpa_Entity_Proj</artifactId>
	<version>0.0.1-SNAPSHOT</version>
	<name>Spring_Boot_Jpa_Entity_Proj</name>
	<description>Demo project for Spring Boot</description>
	<properties>
		<java.version>11</java.version>
	</properties>
	<dependencies>
		<dependency>
			<groupId>org.springframework.boot</groupId>
			<artifactId>spring-boot-starter-data-jpa</artifactId>
		</dependency>
		 <dependency>
            <groupId>org.springframework.boot</groupId>
            <artifactId>spring-boot-starter-web</artifactId>
        </dependency>
		<dependency>
			<groupId>com.h2database</groupId>
			<artifactId>h2</artifactId>
			<scope>runtime</scope>
		</dependency>
		<dependency>
			<groupId>org.springframework.boot</groupId>
			<artifactId>spring-boot-starter-test</artifactId>
			<scope>test</scope>
		</dependency>
	</dependencies>
	<build>
		<plugins>
			<plugin>
				<groupId>org.springframework.boot</groupId>
				<artifactId>spring-boot-maven-plugin</artifactId>
			</plugin>
		</plugins>
	</build>
</project>
3. Configuring Database
We are configuring the H2 Database in the application.properties of this project.
 spring.datasource.url=jdbc:h2:mem:test
 #spring.datasource.driverClassName=org.h2.Driver
 spring.datasource.username=sa
 spring.datasource.password=
 spring.jpa.show-sql=true
 spring.jpa.properties.hibernate.dialect=org.hibernate.dialect.H2Dialect
 spring.jpa.hibernate.ddl-auto= update
 spring.h2.console.enabled=true
→ The list of the options which is used in the “spring.jpa.hibernate.ddl-auto=xxxxxx” are:
• validate: It validates the schema and makes no changes to the database.
• update: update the schema.
• create: It creates the schema, destroying previous data from the database.
• create-drop: It drops the schema at the end of a session.
• none: are all other cases.
• To avoid data loss you use the update.
→ There is no need to define the driver class name explicitly. This is implicitly registered.
spring.datasource.driverClassName=org.h2.Driver→ spring.h2.console.enabled=true informs Spring to start the H2 Database administration tool and you can access this tool on the browser: http://localhost:8080/h2-console. We can also modify it as per our requirements.
→ By default the username is “sa” and the password is empty of the H2 database. We can also change it as per our requirements.
→ If we do not define this data source URL then it will be automatically created. You can check on your console
spring.datasource.url=jdbc:h2:mem:[database name]4. Creating a JPA Entity class
We are creating a Java Bean class and we are using the @Entity annotation of JPA.
Person.java:
package com.poc.entity;
import javax.persistence.Entity;
import javax.persistence.GeneratedValue;
import javax.persistence.GenerationType;
import javax.persistence.Id;
@Entity
public class Person {
//properties
@Id
@GeneratedValue(strategy = GenerationType.IDENTITY)
private Long id;
private String fName;
private String lName;
public Person() {
}
public Long getId() {
return id;
}
public void setId(Long id) {
this.id = id;
}
public String getfName() {
return fName;
}
public void setfName(String fName) {
this.fName = fName;
}
public String getlName() {
return lName;
}
public void setlName(String lName) {
this.lName = lName;
	}
}
→ This is an entity class that is annotated with “@Entity” annotation and the table will be created with the same name as this class “person”.We can also modify the table name in the database by using the “@Table(name = “name_table”)” annotation.
→ The Person class’s id property is annotated with this “@Id” annotation so that JPA recognizes it as the Id of this class. The id property of this class is also annotated with this “@GeneratedValue” annotation to indicate that the id should be created automatically in the table.
→ The “@GeneratedValue” annotation is used to configure the way of incrementing the specified column of the entity class’s property.
→ The list of the option which is used in the “GenerationType.xxxxxx” are:
• AUTO: It represents that the persistence provider should pick an appropriate strategy for the specific database.
• IDENTITY: It represents that the persistence provider must assign primary keys for the entity using a database identity column.
• SEQUENCE: It represents that the persistence provider must assign primary keys for the entity class using a database sequence.
• TABLE: It represents that the persistence provider must assign primary keys for the entity using an underlying database table to ensure uniqueness.
→ The column name of that table created in the database through the entity class has the same name as the properties of the class. We can modify it as per our need by using “@Column(name = “—–“)”.
→ If we want to generate automatic setter and getter methods for this class. We can use Lombok annotation to generate setter and getter methods.
5. Creating a JPA Repository
We are creating a JPA Repository from Spring Data JPA which is used for persistence operations for the JPA entity class.
PersonRepository.java
package com.poc.repo;
import org.springframework.data.jpa.repository.JpaRepository;
import com.poc.entity.Person;
public interface PersonRepository extends JpaRepository<Person, Long> {
}
→ JpaRepository notably reduces the boilerplate code required to implement data access layers for various persistence stores.
6. Creating a Service
We are creating a Service interface(PersonService) and its implementation class(PersonServiceImpl) for this project.
PersonService.java
package com.poc.service;
import java.util.List;
import com.poc.entity.Person;

public interface PersonService {
void save(Person person);
List<Person> getPersonList();
}
PersonServiceImpl.java
package com.poc.service;
import java.util.List;
import org.springframework.beans.factory.annotation.Autowired;
import org.springframework.stereotype.Service;
import com.poc.entity.Person;
import com.poc.repo.PersonRepository;

@Service
public class PersonServiceImpl implements PersonService {
@Autowired
PersonRepository personRepo;
@Override
public void save(Person person) {
personRepo.save(person);
}
@Override
public List<Person> getPersonList() {
return personRepo.findAll();
	}
}
7. Inserting Records
We are inserting some records into the H2 database table through CommandLineRunner.
package com.poc;
import org.springframework.boot.CommandLineRunner;
import org.springframework.boot.SpringApplication;
import org.springframework.boot.autoconfigure.SpringBootApplication;
import org.springframework.context.annotation.Bean;
import com.poc.entity.Person;
import com.poc.service.PersonService;

@SpringBootApplication
public class SpringBootJpaEntityPocApplication {
public static void main(String[] args) {
SpringApplication.run(SpringBootJpaEntityPocApplication.class, args);
}
@Bean
public CommandLineRunner demo(PersonService personService) {
return (args) -> {
//save few people
Person person1 = new Person();
person1.setfName("Peter");
person1.setlName("Parker");
Person person2 = new Person();
person2.setfName("Robert");
person2.setlName("Smith");
personService.save(person1);
personService.save(person2);
//fetch all person
System.out.println("-----List of Persons------");
for (Person person : personService.getPersonList()) {
System.out.println("Person Detail:" + person);
	}
  };
 }
}
8. Run the Spring Project
Right-click on SpringBootApplication class(SpringBootJpaEntityPocApplication) then click on RunAs Java Application.
Conclusion
This example is explained:
• What is the use of an Entity class?
• How to create the table in the database and database query from Java code?
• How to use the H2 database in the Spring Boot project?
• What is the H2 database?
Nicely done explaining the Spring Boot project with JPA entities! I’m curious, though—do you have any insights on tweaking the H2 database for production use? I’ve heard some useful tips over at Sebbie’s blog about managing such setups effectively. Thanks for the guide, it’s a solid introduction!