Last updated on February 28th, 2024
Spring Bean Configuration with annotation using @Component without declaring bean id. Then Spring Container creates a Default Bean Id for the Spring Bean.
Default Bean Id:
The class name first letter with lowercase Spring container will be created Spring bean id automatically.
eg: CricketCoach(Class Name)—->cricketCoach( Default Bean Id)
In this example, we are configuring Spring Bean with Java Annotation and XML configuration. In this, we are using the “@Component” annotation for the Spring Bean class and configuring the base package by using this tag “<context:component-scan base-package=”base_package_name”/>”.If we are done with these configurations in the application. Then Spring container scans the application package where it finds the @Component annotated class register automatically as Spring bean with the default bean id of the class. There is no need to configure every class as Spring bean in the XML configuration file. This based configuration is really helpful when we are working with a real-time application. Because this application contains lots of Spring Bean, configuring the XML configuration file is very difficult and consumes a lot of time configuring these Spring bean classes. So, we overcome this problem with those Spring bean classes annotated with the “@Component” annotation.
In this example of the project, we will create two POJO classes first class is CricketTeam.java and the second class is CricketCoach.java.We will configure Spring Bean classes for these POJO classes with the help of the “@Component” annotation. So the Spring Container configures these classes to Spring Bean classes. In this applicationContext.xml configuration file, we only configure the base package of this project. We will create the main class i.e., ClientApp.java which activates the Spring Container and load the applicationContext.xml file. Then we will get Spring Bean classes and access their method to print output on the console.
Development Process:
1. Keep eclipse IDE ready
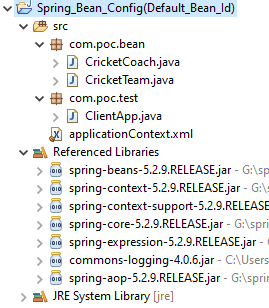
2. Project Structure
3. Enable component scanning in the Spring config file
4. Add the jar file to the Build Path of the Project for the example of the Spring Bean Default id with @Component annotation
5. Create a POJO Class and Add the @Component Annotation
6. Create Main Class
7. Run the App
1. Keep eclipse IDE ready
2. Project Structure
3. Enable component scanning in the Spring config file
applicationContext.xml:
<?xml version="1.0" encoding="UTF-8"?>
<beans
	xmlns="http://www.springframework.org/schema/beans"
	xmlns:xsi="http://www.w3.org/2001/XMLSchema-instance"
	xmlns:context="http://www.springframework.org/schema/context"

    xsi:schemaLocation="http://www.springframework.org/schema/beans

    http://www.springframework.org/schema/beans/spring-beans.xsd

    http://www.springframework.org/schema/context

    http://www.springframework.org/schema/context/spring-context.xsd">
	<!-- enable component scanning -->
	<context:component-scan base-package="com.poc"/>
</beans>
4. Add the jar file to the Build Path of the Project for the example of the Spring Bean Default id with @Component annotation
Right Click on Project(Spring_Bean_Config(Default_Bean_Id)) ⇒ Build Path ⇒ Java Build Path libraries ⇒ Add External jars
Commons-logging-<version>.jar
spring-beans-<version>.jar
spring-context-<version>.jar
spring-context-support-<version>.jar
spring-core-<version>.jar
spring-expression-<version>.jar
spring-aop-<version>.jar
5. Create a POJO Class and Add the @Component Annotation
CricketCoach.java(Pojo Class):
package com.poc.bean;

import org.springframework.stereotype.Component;

@Component
public class CricketCoach {

public CricketCoach() {

System.out.println("The 0-param constructor of CricketCoach");

}

  public String getDailyWorkout() {

    return "6 hours of Practice";

  }

}
→ Spring Container registered this class as Spring Bean with the default Bean Id being “cricketCoach” automatically because this class is annotated with the “@Component” annotation.
→ @Component annotation is helpful when we are working on Java Config Spring Bean configuration and making a Spring Boot Application.
CricketTeam.java (Pojo Class):
package com.poc.bean;

import org.springframework.stereotype.Component;

@Component
public class CricketTeam {

  public CricketTeam() {

    System.out.println("0-param constructor CricketTeam");

  }

  public String getTeamName() {

    return "Kings XI Punjab";

  }

}
→ Spring Container registered this class as Spring Bean with the default Bean Id being “cricket team” automatically because this class is annotated with the “@Component” annotation.
→ This annotation is a class-level annotation to make the Spring Bean class.
6. Create Main Class
ClientApp.java:
package com.poc.test;

import org.springframework.context.support.ClassPathXmlApplicationContext;

import com.poc.bean.CricketCoach;

import com.poc.bean.CricketTeam;

public class ClientApp {

  public static void main(String[] args) {

// load the spring Configuration file
ClassPathXmlApplicationContext context =

      new ClassPathXmlApplicationContext("applicationContext.xml");

//retrieve bean from spring container
CricketCoach theCoach = context.getBean("cricketCoach", CricketCoach.class);

CricketTeam theTeam = context.getBean("cricketTeam", CricketTeam.class);

// call the method on bean
System.out.println(theCoach.getDailyWorkout());

System.out.println(theTeam.getTeamName());

context.close();

  }

}
7. Run the App
Output:
The 0-param constructor of CricketCoach
The 0-param constructor CricketTeam
6 hours of Practice
Kings XI Punjab
Conclusion:
This topic is explained What is the default Bean Id? How to use the default bean id to retrieve the bean from Container?