Last updated on March 14th, 2024
This topic will teach us how to implement one-to-one(@OneToOne annotation) mapping with join table(@JoinTable annotation)using Spring Boot, Hibernate, Spring Data JPA, H2 Database and Lombok.
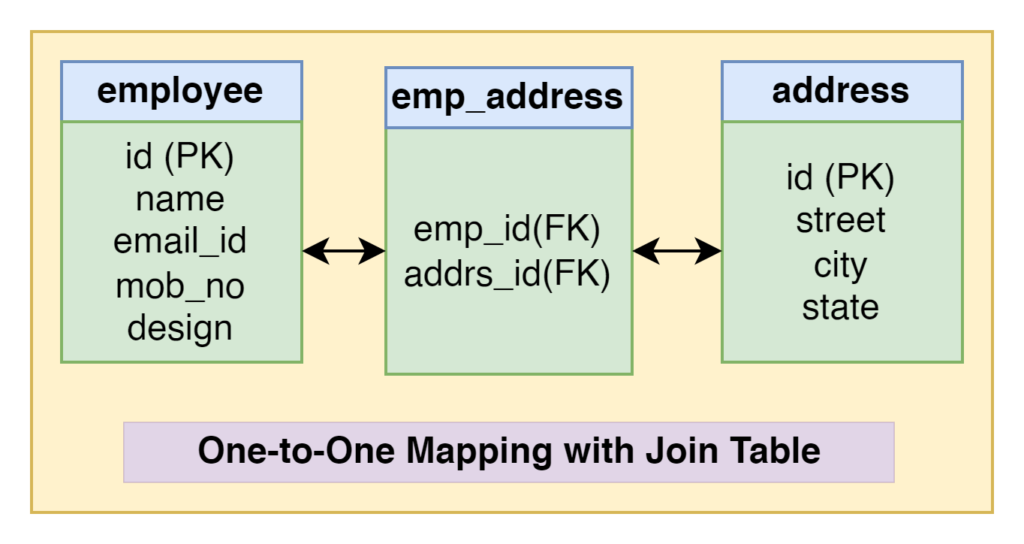
In the one-to-one relationship between Employee and Address, an employee can have address detail or not, so we need the join table emp_address to avoid null values if an employee doesn’t have address detail. We will create a restful web service example to implement one-to-one mapping with a join table in Spring Boot. Let’s begin to implement this
Table of Contents
1. Create a Spring Boot Starter Project for one-to-one mapping with a join table
2. Maven Dependency
3. Define the H2 database configuration
4. Create Entity
5. Create Repository
6. Create Service
7. Create Model
8. Create a Controller
9. Run the app
10. Conclusion
1. Create a Spring Boot Starter Project for one-to-one mapping with join table
Add the following dependencies:
• Spring Web
• Lombok
• H2 Database
• Spring Data JPA
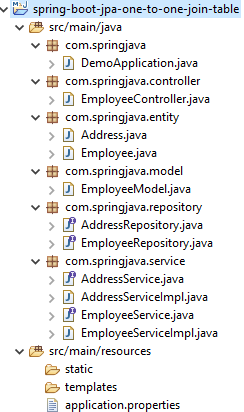
Project Structure
2. Maven Dependency
pom.xml
<?xml version="1.0" encoding="UTF-8"?>
<project xmlns="http://maven.apache.org/POM/4.0.0"
    xmlns:xsi="http://www.w3.org/2001/XMLSchema-instance"
    xsi:schemaLocation="http://maven.apache.org/POM/4.0.0 https://maven.apache.org/xsd/maven-4.0.0.xsd">
    <modelVersion>4.0.0</modelVersion>
    <parent>
        <groupId>org.springframework.boot</groupId>
        <artifactId>spring-boot-starter-parent</artifactId>
        <version>2.6.3</version>
        <relativePath /> <!-- lookup parent from repository -->
    </parent>
    <groupId>com.springjava</groupId>
    <artifactId>demo</artifactId>
    <version>0.0.1-SNAPSHOT</version>
    <name>demo</name>
    <description>Demo project for Spring Boot</description>
    <properties>
        <java.version>8</java.version>
    </properties>
    <dependencies>
        <dependency>
            <groupId>org.springframework.boot</groupId>
            <artifactId>spring-boot-starter-data-jpa</artifactId>
        </dependency>
        <dependency>
            <groupId>org.springframework.boot</groupId>
            <artifactId>spring-boot-starter-web</artifactId>
        </dependency>
        <dependency>
            <groupId>org.projectlombok</groupId>
            <artifactId>lombok</artifactId>
            <optional>true</optional>
        </dependency>
        <dependency>
            <groupId>com.h2database</groupId>
            <artifactId>h2</artifactId>
            <scope>runtime</scope>
        </dependency>
        <dependency>
            <groupId>org.springframework.boot</groupId>
            <artifactId>spring-boot-starter-test</artifactId>
            <scope>test</scope>
        </dependency>
    </dependencies>
    <build>
        <plugins>
            <plugin>
                <groupId>org.springframework.boot</groupId>
                <artifactId>spring-boot-maven-plugin</artifactId>
            </plugin>
        </plugins>
    </build>
</project>
3. Define the H2 database configuration
We are configuring the H2 database for this example(one-to-one mapping with join table) in the application.properties file.
spring.datasource.url=jdbc:h2:mem:test
spring.datasource.username=sa
spring.datasource.password=
spring.jpa.show-sql=true
spring.jpa.properties.hibernate.dialect=org.hibernate.dialect.H2Dialect
spring.jpa.hibernate.ddl-auto=update
spring.h2.console.enabled=true
4. Create Entity
Employee.java
package com.springjava.entity;
import javax.persistence.CascadeType;
import javax.persistence.Entity;
import javax.persistence.GeneratedValue;
import javax.persistence.GenerationType;
import javax.persistence.Id;
import javax.persistence.JoinColumn;
import javax.persistence.JoinTable;
import javax.persistence.OneToOne;
import lombok.Data;
@Entity
@Data
public class Employee {
@Id
@GeneratedValue(strategy = GenerationType.IDENTITY)
private Integer id;
private String name;
private String emailId;
private String mobNo;
private String design;
@OneToOne(cascade = CascadeType.ALL)
@JoinTable(name = "emp_address",
    joinColumns = {@JoinColumn(name = "emp_id", referencedColumnName = "id")},
    inverseJoinColumns = {@JoinColumn(name = "addrs_id", referencedColumnName = "id")}
)
private Address address;
}
→ We created the Employee Java Bean class and annotated it with JPA annotation to map this class into a database table.
→ We use @JoinTable to generate a third table which holds foreign key columns.
→ We use Lombok annotation(@Data) to constructor, setter, getter etc.
Address.java
package com.springjava.entity;
import javax.persistence.Entity;
import javax.persistence.GeneratedValue;
import javax.persistence.GenerationType;
import javax.persistence.Id;
import javax.persistence.OneToOne;
import lombok.Data;
@Entity
@Data
public class Address {
@Id
@GeneratedValue(strategy = GenerationType.IDENTITY)
private Integer id;
private String street;
private String city;
private String state;
@OneToOne(mappedBy = "address")
private Employee employee;
}
→ We have an employee property in the Address class and an address property in the Employee class, which means we can now navigate in both directions.
5. Create Repository
EmployeeRepository.java
package com.springjava.repository;
import org.springframework.data.jpa.repository.JpaRepository;
import com.springjava.entity.Employee;
public interface EmployeeRepository extends JpaRepository<Employee, Integer> {
}
AddressRepository.java
package com.springjava.repository;
import org.springframework.data.jpa.repository.JpaRepository;
import com.springjava.entity.Address;
public interface AddressRepository extends JpaRepository<Address, Integer> {
}
6. Create Service
EmployeeService.java
package com.springjava.service;
import java.util.List;
import com.springjava.entity.Employee;
public interface EmployeeService {
void save(Employee emp);
List<Employee> findAll();
}
EmployeeServiceImpl.java
package com.springjava.service;
import java.util.List;
import org.springframework.beans.factory.annotation.Autowired;
import org.springframework.stereotype.Service;
import com.springjava.entity.Employee;
import com.springjava.repository.EmployeeRepository;
@Service
public class EmployeeServiceImpl implements EmployeeService {
@Autowired
EmployeeRepository employeeRepository;
@Override
public void save(Employee emp) {
employeeRepository.save(emp);
}
@Override
public List<Employee> findAll() {
return employeeRepository.findAll()
      }
}
AddressService.java
package com.springjava.service;
import java.util.List;
import com.springjava.entity.Address;
public interface AddressService {
List<Address> findAll();
}
AddressServiceImpl.java
package com.springjava.service;
import java.util.List;
import org.springframework.beans.factory.annotation.Autowired;
import org.springframework.stereotype.Service;
import com.springjava.entity.Address;
import com.springjava.repository.AddressRepository;
@Service
public class AddressServiceImpl implements AddressService {
@Autowired
AddressRepository addressRepository;
public List<Address> findAll() {
return addressRepository.findAll();
    }
}
7. Create Model
We are creating the Java Bean class as a model class to take employee details for save them into the database.
EmployeeModel.java
package com.springjava.model;
import lombok.Data;
@Data
public class EmployeeModel {
private Integer id;
private String name;
private String emailId;
private String mobNo;
private String design;
private String street;
private String city;
private String state;
}
8. Create a Controller
EmployeeController.java
package com.springjava.controller;
import java.util.ArrayList;
import java.util.LinkedHashMap;
import java.util.List;
import java.util.Map;
import org.springframework.beans.factory.annotation.Autowired;
import org.springframework.http.HttpStatus;
import org.springframework.http.ResponseEntity;
import org.springframework.web.bind.annotation.GetMapping;
import org.springframework.web.bind.annotation.PostMapping;
import org.springframework.web.bind.annotation.RequestBody;
import org.springframework.web.bind.annotation.RequestMapping;
import org.springframework.web.bind.annotation.RestController;
import com.springjava.entity.Address;
import com.springjava.entity.Employee;
import com.springjava.model.EmployeeModel;
import com.springjava.service.AddressService;
import com.springjava.service.EmployeeService;
@RestController
@RequestMapping("/api")
public class EmployeeController {
@Autowired
AddressService addressService;
@Autowired
EmployeeService employeeService;
@PostMapping("/save")
public ResponseEntity<?> saveEmp(@RequestBody EmployeeModel empModel) {
Map<String, Object> model = new LinkedHashMap<String, Object>();
//creating address object and setting properties
Address address= new Address();
address.setStreet(empModel.getStreet());
address.setCity(empModel.getCity());
address.setState(empModel.getState());
//creating employee object and setting properties
Employee emp=new Employee();
emp.setName(empModel.getName());
emp.setEmailId(empModel.getEmailId());
emp.setMobNo(empModel.getMobNo());
emp.setDesign(empModel.getDesign());
emp.setAddress(address);
//saving employee into db
employeeService.save(emp);
model.put("status", 1);
model.put("message", "Record is Saved Successfully!");
return new ResponseEntity<>(model, HttpStatus.CREATED);
}
@GetMapping("/employees")
public ResponseEntity<?> getEmployees() {
Map<String, Object> model = new LinkedHashMap<String, Object>();
List<Employee> empList= employeeService.findAll();
List<EmployeeModel>empMList=new ArrayList<>();
if (!empList.isEmpty()) {
for(Employee emp:empList) {
EmployeeModel empModel=new EmployeeModel();
empModel.setId(emp.getId());
empModel.setName(emp.getName());
empModel.setEmailId(emp.getEmailId());
empModel.setMobNo(emp.getMobNo());
empModel.setDesign(emp.getDesign());
empModel.setStreet(emp.getAddress().getStreet());
empModel.setCity(emp.getAddress().getCity());
empModel.setState(emp.getAddress().getState());
empMList.add(empModel);
}
model.put("status", 1);
model.put("data", empMList);
return new ResponseEntity<>(model, HttpStatus.OK);
} else {
model.clear();
model.put("status", 0);
model.put("message", "Data is not found");
return new ResponseEntity<>(model, HttpStatus.NOT_FOUND);
}
}
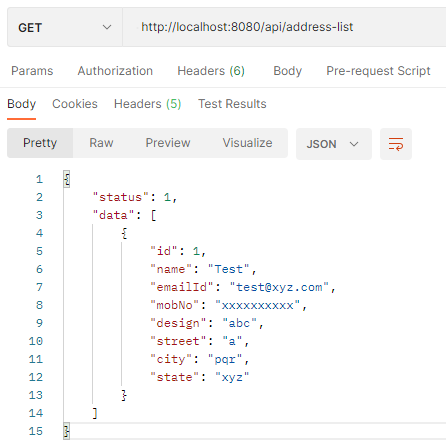
@GetMapping("/address-list")
public ResponseEntity<?> getAddressList() {
Map<String, Object>model = new LinkedHashMap<String, Object>();
List<Address> addList= addressService.findAll();
List<EmployeeModel>empMList=new ArrayList<>();
if (!addList.isEmpty()) {
for(Address address:addList) {
EmployeeModel empModel=new EmployeeModel();
empModel.setId(address.getEmployee().getId());
empModel.setName(address.getEmployee().getName());
empModel.setEmailId(address.getEmployee().getEmailId());
empModel.setMobNo(address.getEmployee().getMobNo());
empModel.setDesign(address.getEmployee().getDesign());
empModel.setStreet(address.getStreet());
empModel.setCity(address.getCity());
empModel.setState(address.getState());
empMList.add(empModel);
}
model.put("status", 1);
model.put("data", empMList);
return new ResponseEntity<>(model, HttpStatus.OK);
} else {
model.clear();
model.put("status", 0);
model.put("message", "Data is not found");
return new ResponseEntity<>(model, HttpStatus.NOT_FOUND);
}
}
}9. Run the app
To run this application one-to-one mapping with Join Table Right-click on the DemoApplication.java then click on Run As after that select Java Application.
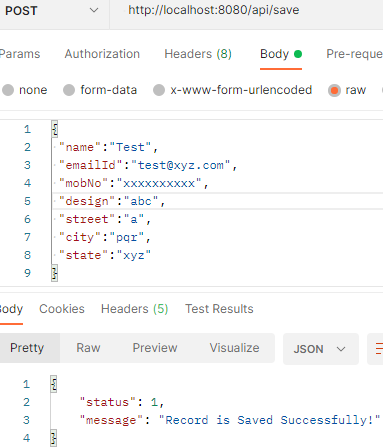
To test the API on the Postman
Url: http://localhost:8080/api/save
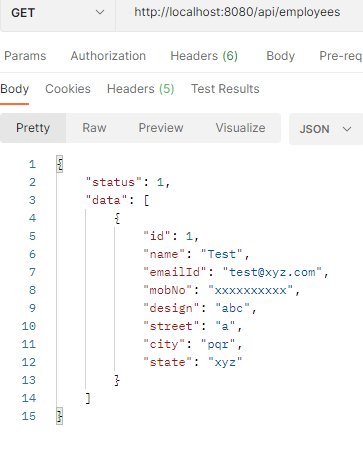
Url: http://localhost:8080/api/employees
Url: http://localhost:8080/api/address-list
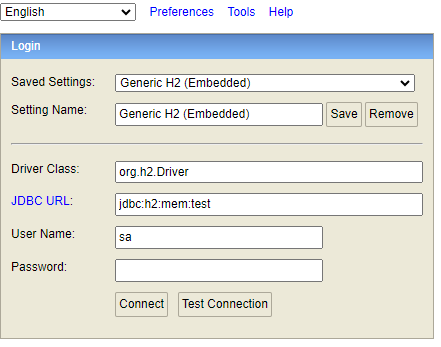
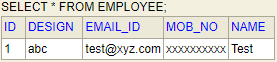
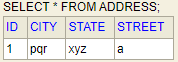
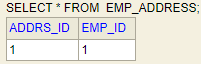
To check the H2 database we can browse this URL “http://localhost:8080/h2-console” on the browser to view the tables in the database which are created by this application.
See all tables below here:
10. Conclusion
In this topic, we learnt about how to implement one-to-one mapping with join table in spring boot, spring data JPA, Lombok and h2 database with rest API example.
Hi it’s me, I am also visiting this web page regularly, this web page is genuinely good and the people are really sharing nice thoughts.
It is appropriate time to make a few plans for the long run and it’s time to be happy. I have read this publish and if I may just I wish to suggest you few fascinating things or suggestions. Maybe you can write subsequent articles relating to this article. I wish to learn more things approximately it!
No matter if some one searches for his required thing, so he/she needs to be available that in detail, so that thing is maintained over here.
I am sure this piece of writing has touched all the internet viewers, its really really nice paragraph on building up new blog.
Superb post however , I was wondering if you could write a litte more on this subject? I’d be very grateful if you could elaborate a little bit further. Cheers!
Great article! This is the type of information that are supposed to be shared around the web. Disgrace on the seek engines for no longer positioning this post higher! Come on over and discuss with my website . Thank you =)
Hello there, just became aware of your blog through Google, and found that it is really informative. I’m going to watch out for brussels. I will be grateful if you continue this in future. Numerous people will be benefited from your writing. Cheers!
Hello There. I found your blog using msn. This is a really well written article. I’ll be sure to bookmark it and return to read more of your useful information. Thanks for the post. I will definitely return.
Generally I don’t read article on blogs, but I wish to say that this write-up very compelled me to take a look at and do it! Your writing style has been amazed me. Thank you, very great article.
It’s a shame you don’t have a donate button! I’d definitely donate to this fantastic blog! I suppose for now i’ll settle for book-marking and adding your RSS feed to my Google account. I look forward to fresh updates and will talk about this blog with my Facebook group. Talk soon!
Very energetic blog, I liked that a lot. Will there be a part 2?
If you are going for finest contents like I do, simply pay a visit this web page all the time as it offers quality contents, thanks
Quality posts is the secret to attract the people to visit the site, that’s what this web site is providing.
Hi mates, pleasant paragraph and nice arguments commented here, I am truly enjoying by these.
First of all I would like to say great blog! I had a quick question that I’d like to ask if you do not mind. I was interested to know how you center yourself and clear your mind prior to writing. I have had a difficult time clearing my thoughts in getting my ideas out there. I truly do enjoy writing but it just seems like the first 10 to 15 minutes tend to be lost simply just trying to figure out how to begin. Any ideas or tips? Appreciate it!
Woah! I’m really enjoying the template/theme of this website. It’s simple, yet effective. A lot of times it’s tough to get that “perfect balance” between superb usability and visual appeal. I must say you’ve done a excellent job with this. Additionally, the blog loads extremely fast for me on Safari. Excellent Blog!
You should be a part of a contest for one of the most useful websites on the web. I will recommend this website!
Wonderful beat ! I wish to apprentice while you amend your web site, how could i subscribe for a blog web site? The account aided me a acceptable deal. I had been tiny bit acquainted of this your broadcast offered bright clear concept
I do not even know how I ended up here, but I thought this post was good. I do not know who you are but certainly you’re going to a famous blogger if you aren’t already 😉 Cheers!
Hello to every single one, it’s really a pleasant for me to visit this web page, it consists of valuable Information.
Fastidious respond in return of this matter with genuine arguments and telling the whole thing on the topic of that.
Excellent blog! Do you have any helpful hints for aspiring writers? I’m planning to start my own site soon but I’m a little lost on everything. Would you suggest starting with a free platform like WordPress or go for a paid option? There are so many choices out there that I’m completely overwhelmed .. Any tips? Thanks a lot!
Spot on with this write-up, I truly believe that this website needs far more attention. I’ll probably be back again to read more, thanks for the information!
Hello friends, its great paragraph regarding cultureand fully defined, keep it up all the time.
Great blog! I am loving it!! Will come back again. I am bookmarking your feeds also.
Currently it seems like BlogEngine is the best blogging platform out there right now. (from what I’ve read) Is that what you’re using on your blog?
I could not resist commenting. Well written!
I’ve been surfing online more than 3 hours today, yet I never found any interesting article like yours. It’s pretty worth enough for me. In my view, if all web owners and bloggers made good content as you did, the net will be much more useful than ever before.
My brother recommended I might like this web site. He was entirely right. This post truly made my day. You can not imagine just how much time I had spent for this information! Thanks!
I always emailed this blog post page to all my associates, since if like to read it afterward my links will too.
This article is truly a nice one it helps new net viewers, who are wishing for blogging.
Great blog here! Also your site loads up very fast! What host are you using? Can I get your affiliate link to your host? I wish my site loaded up as quickly as yours lol
I feel that is among the such a lot vital info for me. And i am satisfied reading your article. But should remark on some common issues, The site taste is ideal, the articles is in reality great : D. Excellent process, cheers
Hi, i think that i saw you visited my site so i came to “return the favor”.I’m trying to find things to improve my site!I suppose its ok to use a few of your ideas!!
When some one searches for his essential thing, thus he/she wants to be available that in detail, so that thing is maintained over here.
Thanks for sharing your thoughts on %meta_keyword%. Regards
Hi! Someone in my Myspace group shared this website with us so I came to check it out. I’m definitely enjoying the information. I’m bookmarking and will be tweeting this to my followers! Exceptional blog and amazing style and design.
Great post. I was checking continuously this weblog and I am impressed! Very helpful info particularly the remaining section 🙂 I deal with such information a lot. I used to be looking for this particular info for a very lengthy time. Thank you and best of luck.
Superb, what a weblog it is! This blog provides valuable information to us, keep it up.
My brother recommended I might like this website. He was entirely right. This post truly made my day. You can not imagine just how much time I had spent for this information! Thanks!
It’s perfect time to make some plans for the long run and it’s time to be happy. I have read this post and if I could I wish to recommend you some interesting things or advice. Perhaps you can write next articles relating to this article. I desire to learn more things approximately it!
I am no longer positive the place you are getting your info, however great topic. I must spend some time learning much more or working out more. Thanks for excellent info I was on the lookout for this information for my mission.
We absolutely love your blog and find most of your post’s to be just what I’m looking for. Does one offer guest writers to write content available for you? I wouldn’t mind publishing a post or elaborating on some of the subjects you write in relation to here. Again, awesome website!