Last updated on March 11th, 2025
In Spring Boot, updating multiple rows is a common requirement using Spring Data JPA. Traditional CRUD operations can update a single row but bulk update us to provide better performance by reducing database calls. We can update multiple rows in Spring Data JPA using JPQL with @Modifying annotation, Native SQL query with @Modifying annotation and saveAll() query method. In this topic, we learn how to update multiple rows in Spring Data JPA in various ways.

Ways to Update Multiple Rows in Spring Data JPA
There are three ways to update multiple rows in Spring Data JPA:
- Using JPQL with @Modifying annotation
- Using Native SQL with @Modifying annotation
- Using saveAll() Query Method
Using JPQL with @Modifying Annotation
JPQL (Java Persistence Query Language) allows updates across multiple rows using the UPDATE statement in the query. The @Modifying annotation is required to indicate that the query modifies data.
Example: Bulk Update Product Prices
import org.springframework.data.jpa.repository.Modifying;
import org.springframework.data.jpa.repository.Query;
import org.springframework.data.repository.JpaRepository;
import org.springframework.stereotype.Repository;
import org.springframework.transaction.annotation.Transactional;

@Repository
public interface ProductRepository extends JpaRepository<Product, Long> {
@Modifying
@Transactional
@Query("UPDATE Product p SET p.price = p.price + :increment WHERE p.category = :category")
int updatePricesByCategory(double increment, String category);

}
Explanation
- @Modifying: It marks the query as an update operation.
- @Transactional: It required to manage the transaction during the update.
- :increment and :category: Bind query parameters.
Usage
@Autowired
private ProductRepository productRepo;
public int updateProductPricesByCategory(double price, String category) {
return productRepo.updatePricesByCategory(price, category);
}
Using Native SQL Queries
Native queries allow us to use raw SQL for bulk updates, providing greater flexibility for database-specific operations.
Example: Update Product Stock Levels
import org.springframework.data.jpa.repository.Modifying;
import org.springframework.data.jpa.repository.Query;
import org.springframework.data.repository.JpaRepository;
import org.springframework.transaction.annotation.Transactional;

public interface ProductRepository extends JpaRepository<Product, Long> {
@Modifying
@Transactional
@Query(value = "UPDATE products SET stock = stock + quantity WHERE category = :category", nativeQuery = true)
int updateStockByCategory(int quantity, String category);
}
Usage
@Autowired
private ProductRepository productRepo;
public int updateProductStocksByCategory(int quantity, String Category) {
return productRepo.updateStockByCategory(quantity, Category);
}
Using saveAll() Query Method
When updating multiple specific entities, saveAll() can be used efficiently.
Example: Update Prices for a List of Products
@Autowired
private ProductRepository productRepo;
public void updateProductList(List<Product> productList, double price) {
productList.forEach(product -> product.setPrice(product.getPrice() + price));
productRepo.saveAll(productList);
}
Usage
List<Product> productList = productRepo.findAll();
updateProductList(productList);
Step-by-step to Guide the Update Multiple Rows in Spring Data JPA
Let’s create a Spring Boot Application to update multiple rows in Spring Data JPA step-by-step. Using the above-mentioned ways, we will create an example to update product prices and stocks through the API endpoints.
These are the following steps:
- Create a Spring Boot Project
- Setup in the IDE
- Configure H2 Database
- Create a JPA Entity
- Create a Repository Interface
- Create a Service Interface
- Implement the Service Interface
- Create a Controller
- Run the Spring Boot Application
1. Create a Spring Boot Project
We are creating a Spring Boot Project from the web tool Spring Initializr. By Providing details for the project and select the following Maven dependencies:
- Spring Web
- Spring Data JPA
- H2 Database
- Lombok
2. Setup in the IDE
We use Eclipse IDE to set up and configure the created Spring Boot Project. You can use other IDE to set up and configure the Spring Boot project.
Project Structure of Spring Boot
This image shows the project structure of Spring Boot in Eclipse IDE.

Maven Dependency
Here is the complete maven dependencies file pom.xml for the project which will implement update multiple rows in JPA using Spring Boot Application.
pom.xml
<?xml version="1.0" encoding="UTF-8"?>
<project
	xmlns="http://maven.apache.org/POM/4.0.0"
	xmlns:xsi="http://www.w3.org/2001/XMLSchema-instance"

xsi:schemaLocation="http://maven.apache.org/POM/4.0.0 https://maven.apache.org/xsd/maven-4.0.0.xsd">
	<modelVersion>4.0.0</modelVersion>
	<parent>
		<groupId>org.springframework.boot</groupId>
		<artifactId>spring-boot-starter-parent</artifactId>
		<version>3.3.0</version>
		<relativePath/>
		<!-- lookup parent from repository -->
	</parent>
	<groupId>com.springjava</groupId>
	<artifactId>demo</artifactId>
	<version>0.0.1-SNAPSHOT</version>
	<name>demo</name>
	<description>Demo project for Spring Boot</description>
	<properties>
		<java.version>17</java.version>
	</properties>
	<dependencies>
		<dependency>
			<groupId>org.springframework.boot</groupId>
			<artifactId>spring-boot-starter-data-jpa</artifactId>
		</dependency>
		<dependency>
			<groupId>org.springframework.boot</groupId>
			<artifactId>spring-boot-starter-web</artifactId>
		</dependency>
		<dependency>
			<groupId>com.h2database</groupId>
			<artifactId>h2</artifactId>
			<scope>runtime</scope>
		</dependency>
		<dependency>
			<groupId>org.projectlombok</groupId>
			<artifactId>lombok</artifactId>
			<optional>true</optional>
		</dependency>
		<dependency>
			<groupId>org.springframework.boot</groupId>
			<artifactId>spring-boot-starter-test</artifactId>
			<scope>test</scope>
		</dependency>
	</dependencies>
	<build>
		<plugins>
			<plugin>
				<groupId>org.springframework.boot</groupId>
				<artifactId>spring-boot-maven-plugin</artifactId>
				<configuration>
					<excludes>
						<exclude>
							<groupId>org.projectlombok</groupId>
							<artifactId>lombok</artifactId>
						</exclude>
					</excludes>
				</configuration>
			</plugin>
		</plugins>
	</build>
</project>
3. Configure H2 Database
We will configure the H2 database connection in the application.properties file.
application.properties
#H2 Database Configuration
spring.datasource.url=jdbc:h2:mem:test
spring.datasource.username=sa
spring.datasource.password=
spring.jpa.show-sql=true
spring.jpa.properties.hibernate.dialect=org.hibernate.dialect.H2Dialect
spring.jpa.hibernate.ddl-auto=update
spring.h2.console.enabled=true
4. Create a JPA Entity
Let’s create a JPA Entity class. For example, consider a Product entity and use Lombok for generating setter and getter methods, a constructor, etc.
Product.java
package com.springjava.entity;
import jakarta.persistence.Entity;
import jakarta.persistence.GeneratedValue;
import jakarta.persistence.GenerationType;
import jakarta.persistence.Id;
import lombok.Data;

@Data
@Entity
public class Product {

@Id
@GeneratedValue(strategy = GenerationType.IDENTITY)
private Long id;
private String name;
private String category;
private double price;
private int stock;
}
5. Create a Repository Interface
Create a repository interface for the Product JPA Entity class that interface extends the JpaRepository interface to perform persistence operations using the query method(saveAll) and add custom methods annotated with @Query annotation to define queries for updating multiple rows.
ProductRepository.java
package com.springjava.repository;

import org.springframework.data.jpa.repository.JpaRepository;
import org.springframework.data.jpa.repository.Modifying;
import org.springframework.data.jpa.repository.Query;
import com.springjava.entity.Product;
import jakarta.transaction.Transactional;

public interface ProductRepository extends JpaRepository<Product, Long> {
@Modifying
@Transactional
@Query("UPDATE Product p SET p.price = p.price + :increment WHERE p.category = :category")
int updatePricesByCategory(double increment, String category);

@Modifying
@Transactional
@Query(value = "UPDATE products SET stock = stock + quantity WHERE category = category", nativeQuery = true)
int updateStockByCategory(int quantity, String category);
}
6. Create a Service Interface
Create a Service interface ProductService with some method declaration.
ProductService.java
package com.springjava.service;

import java.util.List;
import com.springjava.entity.Product;

public interface ProductService {
void saveAll(List productList);
int updateProductPricesByCategory(double price, String category);
int updateProductStocksByCategory(int quantity, String category);
void updateProductList(List productList,double price);
List getList();
}
7. Implement the Service Interface
Implement the ProductService interface in the ProductServiceImpl class. This class is annotated with @Service annotation, where we inject ProductRepository to call all its methods.
ProductServiceImpl.java
package com.springjava.service;

import java.util.List;
import org.springframework.beans.factory.annotation.Autowired;
import org.springframework.stereotype.Service;
import com.springjava.entity.Product;
import com.springjava.repository.ProductRepository;

@Service
public class ProductServiceImpl implements ProductService {
	@Autowired
	private ProductRepository productRepo;

	@Override
	public void saveAll(List<Product> productList) {
		productRepo.saveAll(productList);
	}

	@Override
	public int updateProductPricesByCategory(double price, String category) {
		return productRepo.updatePricesByCategory(price, category);
	}

	@Override
	public int updateProductStocksByCategory(int quantity, String category) {
		return productRepo.updateStockByCategory(quantity, category);
	}

	@Override
	public void updateProductList(List<Product> productList, double price) {
		productList.forEach(product -> product.setPrice(product.getPrice() + price));
		productRepo.saveAll(productList);
	}

	@Override
	public List<Product> getList() {
		return productRepo.findAll();
	}

}
8. Create a Controller
Create a controller class ProductController. This is annotated with @RestController to make this class a Rest Controller.
ProductController.java
package com.springjava.controller;

import java.util.LinkedHashMap;
import java.util.List;
import java.util.Map;
import org.springframework.beans.factory.annotation.Autowired;
import org.springframework.http.HttpStatus;
import org.springframework.http.ResponseEntity;
import org.springframework.web.bind.annotation.PostMapping;
import org.springframework.web.bind.annotation.PutMapping;
import org.springframework.web.bind.annotation.RequestBody;
import org.springframework.web.bind.annotation.RequestMapping;
import org.springframework.web.bind.annotation.RestController;
import com.springjava.entity.Product;
import com.springjava.service.ProductService;

@RestController
@RequestMapping("/api/product")
public class ProductController {
@Autowired
private ProductService productService;

@PostMapping("/save-all")
public ResponseEntity<?> save(@RequestBody List<Product> productList) {
	Map<String, Object> respProd = new LinkedHashMap<String, Object>();
	productService.saveAll(productList);
	respProd.put("status", 1);
	respProd.put("message", "Record is Saved Successfully!");
	return new ResponseEntity<>(respProd, HttpStatus.CREATED);
}

@PutMapping("/update-price-by-category")
public ResponseEntity<?> updatePriceByCategory(@RequestBody Map<String,Object> body) {
	Map<String, Object> respProd = new LinkedHashMap<String, Object>();
	int updateCount=productService.updateProductPricesByCategory(Double.parseDouble(body.get("price").toString()), body.get("category").toString());
	respProd.put("status", 1);
	respProd.put("message", updateCount+" Records are Updated Successfully!");
	return new ResponseEntity<>(respProd, HttpStatus.OK);
}

@PutMapping("/update-stock-by-category")
public ResponseEntity<?> updateStockByCategory(@RequestBody Map<String,Object> body) {
	Map<String, Object> respProd = new LinkedHashMap<String, Object>();
	int updateCount=productService.updateProductStocksByCategory(Integer.parseInt(body.get("price").toString()), body.get("category").toString());
	respProd.put("status", 1);
	respProd.put("message", updateCount+" Records are Updated Successfully!");
	return new ResponseEntity<>(respProd, HttpStatus.OK);
}

@PutMapping("/update-price-products")
public ResponseEntity<?> updatePriceInProducts(@RequestBody Map<String,Object> body) {
	Map<String, Object> respProd = new LinkedHashMap<String, Object>();
	List<Product>prodList = productService.getList();
	productService.updateProductList(prodList, Double.parseDouble(body.get("price").toString()));
	respProd.put("status", 1);
	respProd.put("message","Records are Updated Successfully!");
	return new ResponseEntity<>(respProd, HttpStatus.OK);
    }

}
9. Run the Spring Boot Application
Right-click this Spring Boot application on the DemoApplication.java, then click Run As and select Java Application.
H2 Database Console
To check the H2 database console, we must use the browser URL format such as “http://localhost:[server_port]/h2-console.”
JSON Array
We are creating a sample JSON Array to test the API http://localhost:8080/product/save-all.
[
  {
    "name": "Laptop",
    "category": "Electronics",
    "price": 2000,
    "stock": 5
  },
  {
    "name": "Mobile",
    "category": "Electronics",
    "price": 1500,
    "stock": 15
  },
  {
    "name": "Ear-Bud",
    "category": "Electronics",
    "price": 500,
    "stock": 10
  }
]
Test the APIs on the Postman Tool
POST: http://localhost:8080/api/product/save-all

PUT: http://localhost:8080/api/product/update-price-by-category
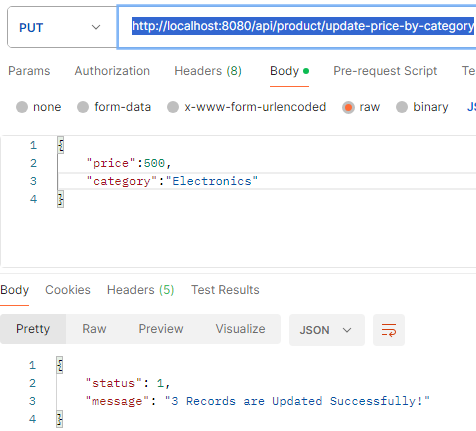
This API hits then Spring Data JPA (internally uses Hibernate as a JPA provider) generates SQL statement in the console below here:
Hibernate: update product p1_0 set price=(p1_0.price+cast(? as float(53))) where p1_0.category=?PUT: http://localhost:8080/api/product/update-stock-by-category

This API hits then Spring Data JPA (internally uses Hibernate as a JPA provider) generates SQL statement in the console below here:
Hibernate: UPDATE product SET stock = stock + ? WHERE category = ?PUT: http://localhost:8080/api/product/update-price-products
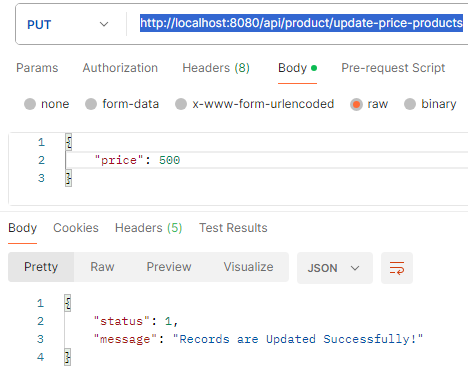
This API hits then Spring Data JPA (internally uses Hibernate as a JPA provider) generates SQL statement in the console below here:
Hibernate: select p1_0.id,p1_0.category,p1_0.name,p1_0.price,p1_0.stock from product p1_0
Hibernate: update product set category=?,name=?,price=?,stock=? where id=?
Hibernate: update product set category=?,name=?,price=?,stock=? where id=?
Hibernate: update product set category=?,name=?,price=?,stock=? where id=?
Best Practices for Bulk Updates in Spring Data JPA
- Use @Transactional: Ensure all update operations are transactional to avoid partial updates.
- Batch Processing: Use saveAll() for batch updates when updating specific rows.
- JPQL vs Native Queries: Prefer JPQL for portability; use native queries for performance optimizations.
- Minimize Select Queries: Avoid fetching data unnecessarily when updating directly.
- Handle Concurrency: Ensure that bulk updates handle concurrency issues by locking or versioning.
Practical Comparison
| Approach | Use Case | Pros | Cons |
| JPQL Query | Bulk updates with JPQL expressions | Portable and database-agnostic | Limited SQL features |
| Native SQL Query | Complex or optimised bulk updates | Full SQL control | Database-specific |
| saveAll() | Updating multiple specific entities | Simple and intuitive | Higher memory usage |
Conclusion
Updating multiple rows efficiently in Spring Data JPA can be achieved through JPQL, native queries, or batch processing with saveAll(). By choosing the right approach based on your use case and following best practices, you can optimize database operations in our Spring Boot applications.