Last updated on March 9th, 2024
To import a CSV file into Spring Boot Application use Apache Commons CSV library to read the content of the file and store it in the Java List. A CSV is a comma-separated value, a simple plain text file containing data with comma separated. In this topic, we will learn how to import CSV file to the database in Spring Boot. We will create a restful web services example of a spring boot application using Spring Web, Spring Data JPA, Lombok, H2 database and Apache Commons CSV. We will create a CSV file with some data on our computer to upload and then import it to the H2 database using the Spring Boot Application.
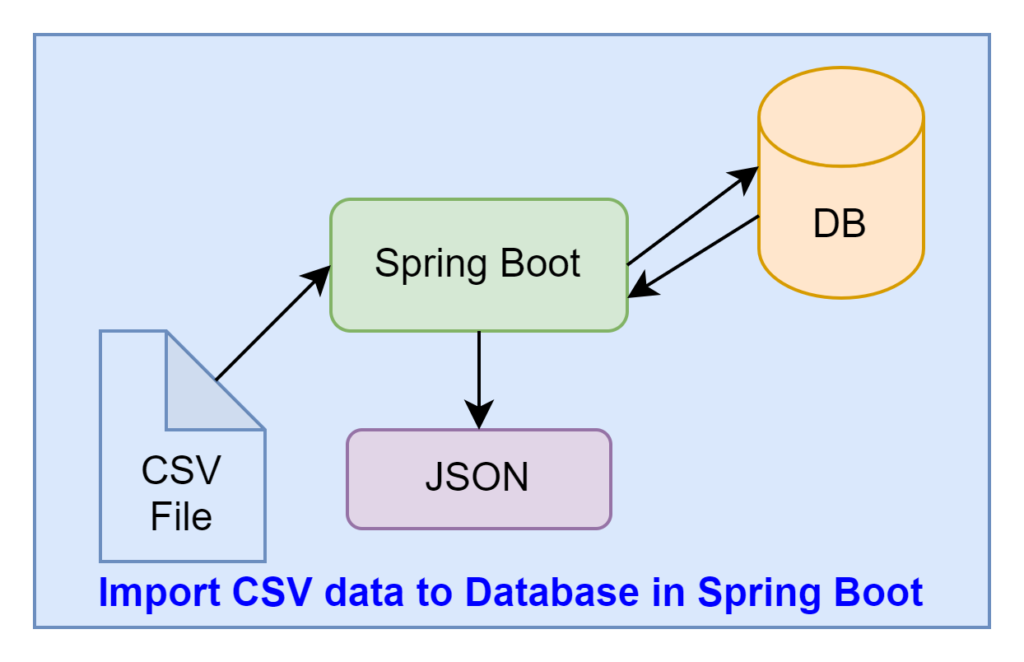
The above diagram shows the process of how we will upload the CSV file to the Spring Boot Application then read that file and insert it into the database after that respond to JSON format. For this, we will create one rest API service for uploading a CSV file and another rest API service for giving responses in JSON form. Let’s begin to implement
1. Creating a CSV file
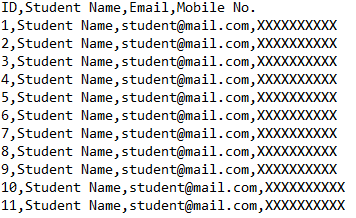
We are creating a CSV file with some data. Here is the image of the CSV file(student.csv) that we created for uploading through the application.
2. Creating a Spring Boot Starter Project
We are creating a Spring Boot Application from the web tool Spring Initializr or you can create it from the IDE that you are using.
Add the following dependencies:
• Spring Web
• Lombok
• H2 Database
• Spring Data JPA
3. Keep the IDE ready
We are importing this created application into our Eclipse IDE or you can import it into another IDE you use.
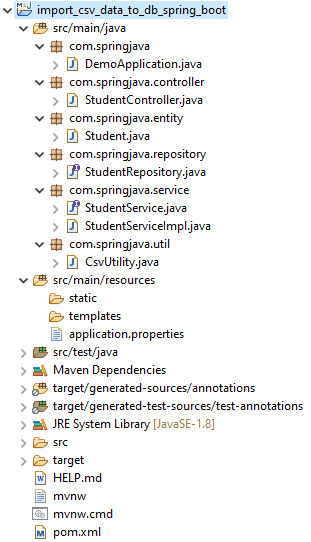
Project Structure of import CSV file in Spring Boot
4. Configuring Apache Commons CSV dependency
We are configuring this dependency into the pom.xml file of that Spring Boot Application.
<dependency>
<groupId>org.apache.commons</groupId>
<artifactId>commons-csv</artifactId>
<version>1.8</version>
</dependency>
→ This dependency library provides us with classes to read CSV file data.
5. Maven Dependency
Here is the complete pom.xml file with the Apache Commons CSV dependency of this application.
pom.xml
<?xml version="1.0" encoding="UTF-8"?>
<project xmlns="http://maven.apache.org/POM/4.0.0"
    xmlns:xsi="http://www.w3.org/2001/XMLSchema-instance"
    xsi:schemaLocation="http://maven.apache.org/POM/4.0.0 https://maven.apache.org/xsd/maven-4.0.0.xsd">
    <modelVersion>4.0.0</modelVersion>
    <parent>
        <groupId>org.springframework.boot</groupId>
        <artifactId>spring-boot-starter-parent</artifactId>
        <version>2.6.3</version>
        <relativePath /> <!-- lookup parent from repository -->
    </parent>
    <groupId>com.springjava</groupId>
    <artifactId>demo</artifactId>
    <version>0.0.1-SNAPSHOT</version>
    <name>demo</name>
    <description>Demo project for Spring Boot</description>
    <properties>
        <java.version>8</java.version>
    </properties>
    <dependencies>
        <dependency>
            <groupId>org.springframework.boot</groupId>
            <artifactId>spring-boot-starter-data-jpa</artifactId>
        </dependency>
        <dependency>
            <groupId>org.springframework.boot</groupId>
            <artifactId>spring-boot-starter-web</artifactId>
        </dependency>
        <dependency>
            <groupId>org.projectlombok</groupId>
            <artifactId>lombok</artifactId>
            <optional>true</optional>
        </dependency>
        <dependency>
            <groupId>com.h2database</groupId>
            <artifactId>h2</artifactId>
            <scope>runtime</scope>
        </dependency>
        <groupId>org.apache.commons</groupId>
<artifactId>commons-csv</artifactId>
<version>1.8</version>
</dependency>
        <dependency>
            <groupId>org.springframework.boot</groupId>
            <artifactId>spring-boot-starter-test</artifactId>
            <scope>test</scope>
        </dependency>
    </dependencies>
    <build>
        <plugins>
            <plugin>
                <groupId>org.springframework.boot</groupId>
                <artifactId>spring-boot-maven-plugin</artifactId>
            </plugin>
        </plugins>
    </build>
</project>
6. Defining the Configurations
We are configuring the H2 database connection configuration and configuration Multipart file for Servlet in the application.properties file.
application.properties
# H2 Database Configuration
spring.datasource.url=jdbc:h2:mem:test
spring.datasource.username=sa
spring.datasource.password=
spring.jpa.show-sql=true
spring.jpa.properties.hibernate.dialect=org.hibernate.dialect.H2Dialect
spring.jpa.hibernate.ddl-auto=update
spring.h2.console.enabled=true
# Multipart File Configuration
spring.servlet.multipart.max-file-size=2MB
spring.servlet.multipart.max-request-size=2MB
→ This is spring.servlet.multipart.max-file-size for each request of max file size.
→ This is spring.servlet.multipart.max-request-size for max request size of multipart or form-data.
7. Creating a JPA Entity class
We are creating a JPA entity class to create a table through Java code and inserting CSV file data into the table. This class has some properties(id, studentName, email and mobileNo).
Student.java
package com.springjava.entity;
import javax.persistence.Entity;
import javax.persistence.GeneratedValue;
import javax.persistence.GenerationType;
import javax.persistence.Id;
import lombok.Data;
@Data
@Entity
public class Student{
@Id
@GeneratedValue(strategy = GenerationType.IDENTITY)
private Integer id;
private String studentName;
private String email;
private String mobileNo;
}
→ The @Data annotation is a Lombok annotation which generates a constructor, setter method, getter method, etc. for this Java Bean class.
→ This @Entity annotation generates a table in the created database.
→ This @Id annotation is used to create the Primary key column for the table.
→ This @GeneratedValue annotation is used to increment the column.
→ The GenerationType.IDENTITY is used to assign primary keys for the entity using the database identity column.
8. Creating a JPA Repository
We are creating a JPA Repository to use predefined query methods ((saveAll(),findAll(), etc.)to perform persistence operations through Java code.
StudentRepository.java
package com.springjava.repository;
import org.springframework.data.jpa.repository.JpaRepository;
import com.springjava.entity.Student;
public interface StudentRepository extends JpaRepository<Student, Integer> {
}
→ The JpaRepository provide us query method instead of a query. This interface is available in Spring Data JPA.
9. Creating a class to read CSV file data
We are creating a class that reads CSV file data and stores it in the List.
CsvUtility.java
package com.springjava.util;
import java.io.BufferedReader;
import java.io.IOException;
import java.io.InputStream;
import java.io.InputStreamReader;
import java.util.ArrayList;
import java.util.List;
import org.apache.commons.csv.CSVFormat;
import org.apache.commons.csv.CSVParser;
import org.apache.commons.csv.CSVRecord;
import org.springframework.web.multipart.MultipartFile;
import com.springjava.entity.Student;
public class CsvUtility {
    public static String TYPE = "text/csv";
      static String[] HEADERs = { "ID", "Student Name", "Email", "Mobile No." };
      public static boolean hasCsvFormat(MultipartFile file) {
        if (!TYPE.equals(file.getContentType())) {
          return false;
        }
        return true;
      }
      public static List<Student> csvToStuList(InputStream is) {
            try (BufferedReader bReader = new BufferedReader(new InputStreamReader(is, "UTF-8"));
                CSVParser csvParser = new CSVParser(bReader,
                    CSVFormat.DEFAULT.withFirstRecordAsHeader().withIgnoreHeaderCase().withTrim());) {
              List<Student> stuList = new ArrayList<Student>();
              Iterable<CSVRecord> csvRecords = csvParser.getRecords();
              for (CSVRecord csvRecord : csvRecords) {
                Student stu = new Student();
                stu.setId(Integer.parseInt(csvRecord.get("ID")));
                stu.setStudentName(csvRecord.get("Student Name"));
                stu.setEmail(csvRecord.get("Email"));
                stu.setMobileNo(csvRecord.get("Mobile No."));
               stuList.add(stu);
              }
              return stuList;
            } catch (IOException e) {
              throw new RuntimeException("CSV data is failed to parse: " + e.getMessage());
            }
          }
        }
→ In this class, we create two methods(hasCsvFormat(MultipartFile file) and csvToStuList(InputStream is)
→ This hasCsvFormat(MultipartFile file) method checks whether the file format is CSV or not.
→ This csvToStuList(InputStream is) method reads the CSV file data and returns a list of students.
→ Creating BufferReader from the InputStream
BufferedReader bReader = new BufferedReader(new InputStreamReader(is, "UTF-8"));→ Creating CSVParser from the BufferReader
CSVParser csvParser = new CSVParser(bReader, CSVFormat.DEFAULT??);→ Getting CSV data and returning a list of contents
Iterable<CSVRecord> csvRecords = csvParser.getRecords();
Iterating the list of content of the CSV file and reads the content by using csvRecord.get()
for (CSVRecord csvRecord : csvRecords) {
                Student stu = new Student();
                stu.setId(Integer.parseInt(csvRecord.get("ID")));
                stu.setStudentName(csvRecord.get("Student Name"));
                stu.setEmail(csvRecord.get("Email"));
                stu.setMobileNo(csvRecord.get("Mobile No."));
                stuList.add(stu);
              }
10. Creating Service
We are creating a service interface with two methods declaring(save() and findAll()).
StudentService.java
package com.springjava.service;
import java.util.List;
import org.springframework.web.multipart.MultipartFile;
import com.springjava.entity.Student;

public interface StudentService {
void save(MultipartFile file);
 List < Student > findAll();
}
We are creating a service implementation class with @Service annotation.
StudentServiceImpl.java
package com.springjava.service;
import java.io.IOException;
import java.util.List;
import org.springframework.beans.factory.annotation.Autowired;
import org.springframework.stereotype.Service;
import org.springframework.web.multipart.MultipartFile;
import com.springjava.entity.Student;
import com.springjava.repository.StudentRepository;
import com.springjava.util.CsvUtility;
@Service
public class StudentServiceImpl implements StudentService {
  @Autowired
  StudentRepository stuRepo;
  @Override
  public void save(MultipartFile file) {
    try {
      List < Student > stuList = CsvUtility.csvToStuList(file.getInputStream());
      stuRepo.saveAll(stuList);
    } catch (IOException ex) {
      throw new RuntimeException("Data is not store successfully: " + ex.getMessage());
    }
  }
  @Override
  public List < Student > findAll() {
    return stuRepo.findAll();
  }
}
→ This save(MultipartFile file) method stores CSV data in the database.
→ This findAll() method reads database data and returns List<Student>.
11. Creating a Controller
We are creating a controller StudentController class to create two Rest Apis for saving CSV data and providing a response from the database table.
StudentController.java
package com.springjava.controller;
import java.util.LinkedHashMap;
import java.util.List;
import java.util.Map;
import org.springframework.beans.factory.annotation.Autowired;
import org.springframework.http.HttpStatus;
import org.springframework.http.ResponseEntity;
import org.springframework.web.bind.annotation.GetMapping;
import org.springframework.web.bind.annotation.PostMapping;
import org.springframework.web.bind.annotation.RequestMapping;
import org.springframework.web.bind.annotation.RequestParam;
import org.springframework.web.bind.annotation.RestController;
import org.springframework.web.multipart.MultipartFile;
import com.springjava.entity.Student;
import com.springjava.service.StudentService;
import com.springjava.util.CsvUtility;
@RestController
@RequestMapping("/api")
public class StudentController {
  @Autowired
  StudentService stuService;

  @PostMapping("/csv/upload")
  public ResponseEntity < ? > uploadFile(@RequestParam("file") MultipartFile file) {
    String message = "";
    if (CsvUtility.hasCsvFormat(file)) {
      try {
        stuService.save(file);
        message = "The file is uploaded successfully: " + file.getOriginalFilename();
        return ResponseEntity.status(HttpStatus.OK).body(message);
      } catch (Exception e) {
        message = "The file is not upload successfully: " + file.getOriginalFilename() + "!";
        return ResponseEntity.status(HttpStatus.EXPECTATION_FAILED).body(message);
      }
    }
    message = "Please upload an csv file!";
    return ResponseEntity.status(HttpStatus.BAD_REQUEST).body(message);
  }

  @GetMapping("/student-list")
  public ResponseEntity < ? > getStudents() {
    Map < String, Object > respStu = new LinkedHashMap < String, Object > ();
    List < Student > studList = stuService.findAll();
    if (!studList.isEmpty()) {
      respStu.put("status", 1);
      respStu.put("data", studList);
      return new ResponseEntity < > (respStu, HttpStatus.OK);
    } else {
      respStu.clear();
      respStu.put("status", 0);
      respStu.put("message", "Data is not found");
      return new ResponseEntity < > (respStu, HttpStatus.NOT_FOUND);
    }
  }
}
→ The @RestController annotation makes this class RestController to create Rest Apis.
→ The @RequestMapping annotation is used to make the base URL.
→ The @Autowired annotation is used to inject Service.
→ The @PostMapping annotation is used to receive HTTP post requests.
→ The @GetMapping annotation is used to receive HTTP get requests.
→ The POST/excel/upload: uploadFile().
→ The GET/student-list: getStudents().
12. Run the Spring Boot Application and Check
Right Click on the DemoApplication.java then click on RunAs, and select Java Application.
Let’s test Rest Apis on the Postman
POST: http://localhost:8080/api/csv/upload

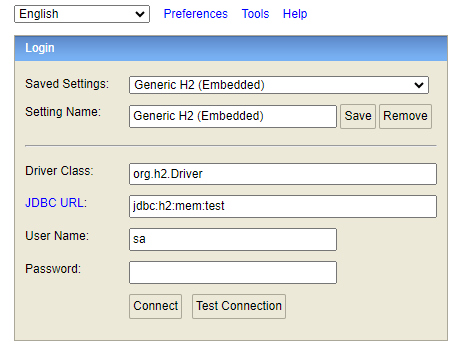
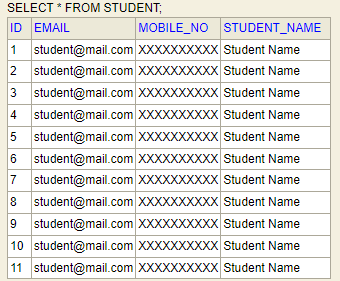
Check the H2 database console and browse this URL “http://localhost:8080/h2-console” for data inserted in the table or not.
See the table below:
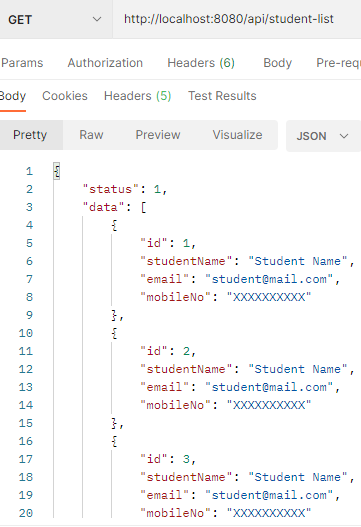
GET: http://localhost:8080/api/student-list
FAQ
Q1: How do I upload a CSV file to the rest api in Spring Boot?
Ans. Create a rest API service method with @PostMapping annotation which accepts MultipartFile requests.
Q2: How do I insert data from a CSV file into the database in Spring Boot?
Ans. By using the Apache Commons CSV library to read the content of the CSV and save it in the List, then that List inserts it into the database by Spring Data JPA in Spring Boot.
Q3: How do I export database data in a CSV file in Spring Boot?
Ans. By using the Apache Commons CSV library to export the database into a CSV file in Spring Boot.
Refer to this article to learn how to export data to a CSV file in Spring Boot.
Conclusion
In this topic, we learnt how to import CSV file data to a database using Spring Boot with Rest Apis and Apache Commons CSV library.