Last updated on March 9th, 2024
Spring Framework provides us to develop web applications through the Spring MVC module. Developing web application in Spring MVC is need lots of configurations like
• We will configure a Server
• We will configure the DispatcherServlet FrontController in the “web.xml” file
• We will configure the resources in the “dispatcher-servlet.xml” configuration file
In the Spring MVC, we can do configuration with XML-based or Java-based. It will always make a bit of confusion in our minds when developing web applications in the Spring MVC.
These will take lots of time to set up and configure Spring MVC application development. Then web applications in Spring MVC take time to develop.
So, Spring Boot gives a solution to these problems when we use Spring MVC and Spring Boot for developing web applications. Spring Boot provides embedded server support that will save our time on the server configuration for the web application development. If we need the external server configuration for the application it is also supported. There is no confusion about whether we will go Java-based or XML-based configuration or Java annotation with XML config for developing web applications. Because Spring Boot follows a Java-based configuration. DispatcherServlet configuration is the default provided by Spring Boot for web application development. We configure other resources through the “application.properties” file or Java class like view page, CSS, static image, etc.
Spring Boot applications are run through an embedded server or external server. It is based on our requirements.
The Spring Boot web application development is fast as compared to Spring MVC web application development and which configuration is suitable for our application.
In this application, we can configure Spring MVC and Spring Boot App through the “application.properties” file.
Table of content
1. Keep eclipse IDE ready
2. Create a Spring Boot Starter Project(Select Spring Web dependency)
3. Create a view page
4. Create a Controller class
5. Define View Resolver Path in application.properties
6. Run the Project
1. Keep eclipse IDE ready
2. Create a Spring Boot Starter Project(Select Spring Web dependency)

Maven Dependency
  <?xml version="1.0" encoding="UTF-8"?>
<project
xmlns="http://maven.apache.org/POM/4.0.0" xmlns:xsi="http://www.w3.org/2001/XMLSchema-instance"
	xsi:schemaLocation="http://maven.apache.org/POM/4.0.0 https://maven.apache.org/xsd/maven-4.0.0.xsd">
	<modelVersion>4.0.0</modelVersion>
	<parent>
		<groupId>org.springframework.boot</groupId>
		<artifactId>spring-boot-starter-parent</artifactId>
		<version>2.6.2</version>
		<relativePath/> <!-- lookup parent from repository -->
	</parent>
	<groupId>com.example</groupId>
	<artifactId>SpringBootWithSpringMVC</artifactId>
	<version>0.0.1-SNAPSHOT</version>
	<packaging>war</packaging>
	<name>SpringBootWithSpringMVC</name>
	<description>Demo project for Spring Boot</description>
	<properties>
		<java.version>1.8</java.version>
	</properties>
	<dependencies>
		<dependency>
			<groupId>org.springframework.boot</groupId>
			<artifactId>spring-boot-starter-web</artifactId>
		</dependency>

		<dependency>
			<groupId>org.springframework.boot</groupId>
			<artifactId>spring-boot-starter-tomcat</artifactId>
			<scope>provided</scope>
		</dependency>

		<dependency>
            <groupId>org.apache.tomcat.embed</groupId>
            <artifactId>tomcat-embed-jasper</artifactId>
        </dependency>

		<dependency>
			<groupId>org.springframework.boot</groupId>
			<artifactId>spring-boot-starter-test</artifactId>
			<scope>test</scope>
		</dependency>
	</dependencies>

	<build>
		<plugins>
			<plugin>
				<groupId>org.springframework.boot</groupId>
				<artifactId>spring-boot-maven-plugin</artifactId>
			</plugin>
		</plugins>
	</build>
</project>
3. Create a view page
home.jsp
<%@ page language="java" contentType="text/html; charset=ISO-8859-1"
pageEncoding="ISO-8859-1"%>
<!DOCTYPE html>
<html>
<head>
<meta charset="ISO-8859-1">
<body>
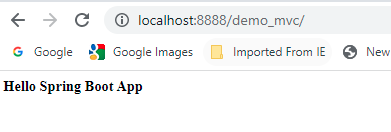
<b> Hello Spring Boot App</b>
</body>
</html>
→ Create under the “WEB-INF/view” folder.
4. Create a Controller class
HomeController.java
package com.example.controller;

import org.springframework.stereotype.Controller;
import org.springframework.web.bind.annotation.GetMapping;

@Controller
public class HomeController {
	@GetMapping("/")
	public String msg() {
     //return a view page name
    return"home";
	}
}
→ @Controller: Specialization of the “@Component” annotation, useful to configure classes as the controller of the Spring MVC app to process requests given by the clients.
→ @GetMapping: Specialization of @RequestMapping with getting type request handler and shortcut of @RequestMapping(method=RequestMehod.GET).
5. Define View Resolver Path in application.properties file
application.properties
# the servlet path
server.servlet.context-path= /demo_mvc
# MVC view prefix
spring.mvc.view.prefix=/WEB-INF/view/
# MVC view suffix
spring.mvc.view.suffix=.jsp
# Embedded Tomcat server port
server.port=8888
6. Run the Project
Right-click on this class i.e., SpringBootWithSpringMvcApplication(automatic generated main class) of this project then click Run as Java Application(Embedded Server).
Go to a web browser and type this URL “http://localhost:8080/demo_mvc/”
Output
Conclusion
This example is explained:
• How to configure the Spring MVC in the Spring Boot?
• How to define the view resolver path and servlet path in the application.properties file?
• What is the use of @GetMapping?