Last updated on March 9th, 2024
In this example, we will learn how to use Spring Security Basic Authentication to secure REST APIs in Spring Boot. We will create a restful web service example in the Spring Boot Application step-by-step. We need to add Spring Security dependency in the Spring Boot Application. Let’s understand what is Basic Authentication

Basic Authentication
• This is the most basic option to secure the REST APIs.
• This uses an HTTP header to provide the username and password when requesting a server.
• This uses a Base 64 encoded username and password in the header.
Table of content
1. Creating a Spring Boot Starter Project
2. Keep Eclipse IDE ready
3. Maven Dependency
4. Defining configuration
5. Creating a class
6. Creating a Controller
7. Run the app
8. Conclusion
1. Creating a Spring Boot Starter Project
We are creating a Spring Boot Project from the web tool Spring Initializr.
Add the following dependencies:
• Spring Web
• Spring Security
2. Keep Eclipse IDE ready
Refer to this article on how to create and set up a Spring Boot project in Eclipse IDE. You also can use other IDE to import this Spring Boot project which you are using.
Project Structure of Spring Security Basic Authentication to Secure Rest APIs

3. Maven Dependency
Here is the complete pom.xml file of this project.
pom.xml
<?xml version="1.0" encoding="UTF-8"?>
<project xmlns="http://maven.apache.org/POM/4.0.0" xmlns:xsi="http://www.w3.org/2001/XMLSchema-instance"
    xsi:schemaLocation="http://maven.apache.org/POM/4.0.0 https://maven.apache.org/xsd/maven-4.0.0.xsd">
    <modelVersion>4.0.0</modelVersion>
    <parent>
        <groupId>org.springframework.boot</groupId>
        <artifactId>spring-boot-starter-parent</artifactId>
        <version>2.7.11</version>
        <relativePath/> <!-- lookup parent from repository -->
    </parent>
    <groupId>com.springjava</groupId>
    <artifactId>Spring_Security_Basic_Authentication_Example</artifactId>
    <version>0.0.1-SNAPSHOT</version>
    <packaging>war</packaging>
    <name>Spring_Security_Basic_Authentication_Example</name>
    <description>Demo project for Spring Boot</description>
    <properties>
        <java.version>16</java.version>
    </properties>
    <dependencies>
        <dependency>
            <groupId>org.springframework.boot</groupId>
            <artifactId>spring-boot-starter-security</artifactId>
        </dependency>
        <dependency>
            <groupId>org.springframework.boot</groupId>
            <artifactId>spring-boot-starter-web</artifactId>
        </dependency>

        <dependency>
            <groupId>org.springframework.boot</groupId>
            <artifactId>spring-boot-starter-tomcat</artifactId>
            <scope>provided</scope>
        </dependency>
        <dependency>
            <groupId>org.springframework.boot</groupId>
            <artifactId>spring-boot-starter-test</artifactId>
            <scope>test</scope>
        </dependency>
        <dependency>
            <groupId>org.springframework.security</groupId>
            <artifactId>spring-security-test</artifactId>
            <scope>test</scope>
        </dependency>
    </dependencies>

    <build>
        <plugins>
            <plugin>
                <groupId>org.springframework.boot</groupId>
                <artifactId>spring-boot-maven-plugin</artifactId>
            </plugin>
        </plugins>
    </build>

</project>
4. Defining configuration
We are configuring the server port for this application in the application.properties file.
application.properties
server.port=88995. Creating a class
We are creating a SecurityConfig class for the Spring Security configuration for the application.
SecurityConfig.java
package com.springjava.security;
import org.springframework.context.annotation.Bean;
import org.springframework.context.annotation.Configuration;
import org.springframework.security.config.Customizer;
import org.springframework.security.config.annotation.web.builders.HttpSecurity;
import org.springframework.security.core.userdetails.User;
import org.springframework.security.core.userdetails.UserDetails;
import org.springframework.security.core.userdetails.UserDetailsService;
import org.springframework.security.crypto.bcrypt.BCryptPasswordEncoder;
import org.springframework.security.crypto.password.PasswordEncoder;
import org.springframework.security.provisioning.InMemoryUserDetailsManager;
import org.springframework.security.web.SecurityFilterChain;

@Configuration
public class SecurityConfig {

    @Bean
    public static PasswordEncoder passwordEncoder() {
        return new BCryptPasswordEncoder();
    }

    @Bean
    SecurityFilterChain securityFilterChain(HttpSecurity http) throws Exception {

        http.csrf().disable().authorizeHttpRequests((authorize) -> {
            authorize.anyRequest().authenticated();
        }).httpBasic(Customizer.withDefaults());
        return http.build();
    }

    @Bean
    public UserDetailsService userDetailsService() {

        UserDetails admin = User.builder().username("admin").password(passwordEncoder().encode("admin")).roles("ADMIN")
                .build();

        return new InMemoryUserDetailsManager(admin);
    }
}
→ In the SecurityConfig class, we configured Spring Security to use basic in-memory authentication.
→ PasswordEncoder is a Service interface for encoding passwords.
→ BCryptPasswordEncoder is a class. This implementation of PasswordEncoder uses the BCrypt strong hashing function.
→ Servlet Filter, the Spring SecurityFilterChain, is responsible for all the security (protecting the application URLs, validating submitted usernames and passwords, redirecting to the login form, and so on) within our application.
→ HttpSecurity class allows configuring web-based security for particular HTTP requests.
→ UserDetailsService interface is used to get user-related data.
6. Creating a Controller
We are creating a MessageController class which is annotated with @RestController to make this RestController class for this application.
MessageController.java
package com.springjava.controller;
import org.springframework.web.bind.annotation.GetMapping;
import org.springframework.web.bind.annotation.RestController;

@RestController
public class MessageController {

    @GetMapping("/hello")
    public String hello() {
        return "Hello Spring Security";
    }
}
→ We created the hello() method and this method is annotated with @GetMapping annotation to accept GET Method HTTP requests.
7. Run the app
Right-click on SpringBootApplication class(SpringSecurityBasicAuthenticationExampleApplication) then click on Run as Java Application.
Testing REST API using Postman
GET: http://localhost:8899/hello
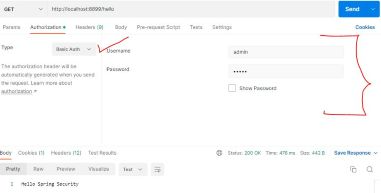
Click on the Authorization menu then select Basic Auth after that enter the username and password.
If we don’t pass the username and password, we will get a 401 status response from this API.
8. Conclusion
In this example, we learnt how to secure Rest API using Spring Security Basic Authentication in Spring Boot Application.