Last updated on May 17th, 2024
In this example, we create a form for user input, and the checkbox then shows user details through the Spring MVC form tag.
<form:checkbox path=" "/> This is provided by the Spring MVC form tag for the checkbox of this application.
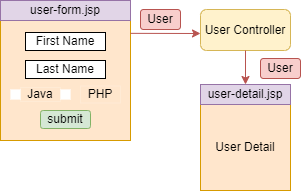
In this example of the application, we will take multiple checkboxes are choose the multiple by the fill the form.
Development Process:
1. Keep Eclipse IDE ready
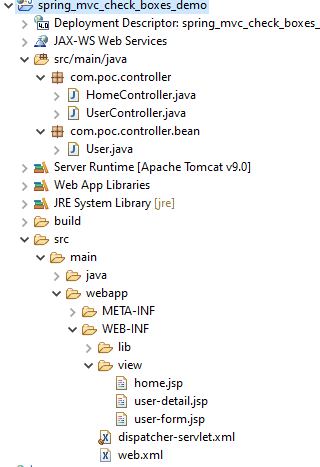
2. Project Structure
3. Add the jar file
4. Configure Spring DispacherServlet
5. Add configuration to a file
6. Create View Page
7. Create Bean Class
8. Create Controller Class
9. Run the App
1. Keep Eclipse IDE ready
2. Project Structure
3. Add the jar file
common-logging-<version>.jar
jstl-<version>.jar
spring-aop-<version>.jar
spring-context-<version>.jar
spring-core-<version>.jar
spring-expression-<version>.jar
spring-web-<version>.jar
spring-webmvc-<version>.jar
4. Create a View Page
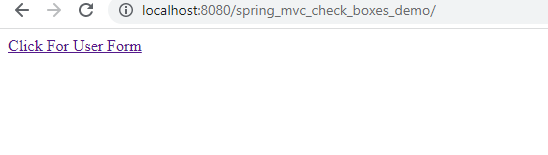
home.jsp:
<%@ page language="java" contentType="text/html; charset=ISO-8859-1" pageEncoding="ISO-8859-1"%>

<!DOCTYPE html>
<html>
<head>
<body>
<a href="http://localhost:8080/spring_mvc_check_boxes_demo/user/showForm">Click For User Form</a>
</body>
</html>
user-form.jsp:
<%@ taglib prefix="form" uri="http://www.springframework.org/tags/form"%>
<!DOCTYPE html>
<html>
<head>
<title>User Registration Form</title>
</head>
<body>
<form:form action="processForm" modelAttribute="user">
First name: <form:input path="firstName" />
<br>
<br>
Last name: <form:input path="lastName" />
<br>
<br>
Technologies:<br>
<form:checkbox path="technologies" value="Java"/>Java
<form:checkbox path="technologies" value="Python"/>Python
<form:checkbox path="technologies" value=".NET"/>.NET
<form:checkbox path="technologies" value="PHP"/>PHP
<br>
<br>
<input type="submit" value="Submit" />
</form:form>
</body>
</html>
→ <form:checkbox path=”technologies”/>“technologies” is a bean class property name.
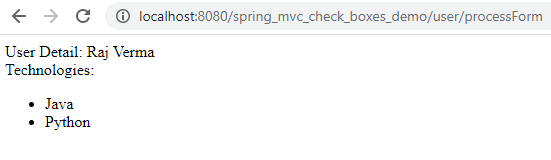
user-detail.jsp:
<%@ taglib uri="http://java.sun.com/jsp/jstl/core" prefix="c" %>
<!DOCTYPE html>
<html>
<head>
<title>User Detail</title>
</head>
<body>User Detail: ${user.firstName} ${user.lastName}<br>
Technologies:
<ul>
<c:forEach var="temp" items="${user.technologies}">
<li>${temp}</li>
</c:forEach>
</ul>
</body>
</html>
5. Configure Spring DispacherServlet
web.xml:
<?xml version="1.0" encoding="UTF-8"?>
<web-app xmlns:xsi="http://www.w3.org/2001/XMLSchema-instance"
xmlns="http://xmlns.jcp.org/xml/ns/javaee"
xsi:schemaLocation="http://xmlns.jcp.org/xml/ns/javaee http://xmlns.jcp.org/xml/ns/javaee/web-app_4.xsd"
id="WebApp_ID" version="4.0">
<display-name>spring-mvc-check-boxes-demo</display-name>
<absolute-ordering />
<!-- Spring MVC Configs -->
<!--  Configure Spring MVC Dispatcher Servlet -->
<servlet>
<servlet-name>dispatcher</servlet-name>
<servlet-class>org.springframework.web.servlet.DispatcherServlet</servlet-class>
<init-param>
<param-name>contextConfigLocation</param-name>
<param-value>/WEB-INF/dispatcher-servlet.xml</param-value>
</init-param>
<load-on-startup>1</load-on-startup>
</servlet>
!-- Set up URL mapping for Spring MVC Dispatcher Servlet of this check boxes demo application -->
<servlet-mapping>
<servlet-name>dispatcher</servlet-name>
<url-pattern>/</url-pattern>
</servlet-mapping>
</web-app>
→ This file is created in the “WEB-INF” directory in the application i.e., spring_mvc_check_boxes_demo
6. Add configuration to a file
dispatcher-servlet.xml:
<?xml version="1.0" encoding="UTF-8"?>
<beans xmlns="http://www.springframework.org/schema/beans"
xmlns:xsi="http://www.w3.org/2001/XMLSchema-instance"
xmlns:context="http://www.springframework.org/schema/context"
xmlns:mvc="http://www.springframework.org/schema/mvc"
xsi:schemaLocation="
http://www.springframework.org/schema/beans
http://www.springframework.org/schema/beans/spring-beans.xsd
http://www.springframework.org/schema/context
http://www.springframework.org/schema/context/spring-context.xsd
http://www.springframework.org/schema/mvc
http://www.springframework.org/schema/mvc/spring-mvc.xsd">


<!-- Add support for component scanning -->
<context:component-scan base-package="com.poc" />
<!-- Add support for conversion, formatting and validation support -->
<mvc:annotation-driven/>

<!-- Define Spring MVC view resolver -->
<bean class="org.springframework.web.servlet.view.InternalResourceViewResolver">
<property name="prefix" value="/WEB-INF/view/" />
<property name="suffix" value=".jsp" />
</bean>
</beans>
7. Create Bean Class
User.java:
package com.poc.controller.bean;

public class User {
private String firstName;
private String lastName;
private String [] technologies;

public User() {

}

public String getFirstName() {

return firstName;

}

public void setFirstName(String firstName) {

this.firstName = firstName;

}

public String getLastName() {

return lastName;

}

public void setLastName(String lastName) {

this.lastName = lastName;

}


public String [] getTechnologies() {

return technologies;

}

public void setTechnologies(String [] technologies) {

this.technologies = technologies;
     }
}
8. Create Controller Class
HomeController.java:
package com.poc.controller;
import org.springframework.stereotype.Controller;
import org.springframework.web.bind.annotation.RequestMapping;

@Controller
public class HomeController {

@RequestMapping("/")
public String showPage() {
return "home";
   }
}
UserController.java:
package com.poc.controller;
import org.springframework.stereotype.Controller;
import org.springframework.ui.Model;
import org.springframework.web.bind.annotation.ModelAttribute;
import org.springframework.web.bind.annotation.RequestMapping;
import com.poc.controller.bean.User;

@Controller
@RequestMapping("/user")
public class UserController{


@RequestMapping("/showForm")
public String showForm(Model theModel) {

// create a User object
User user=new User();

theModel.addAttribute("user",user);

return "user-form";
}

@RequestMapping("/processForm")
public String processForm(@ModelAttribute("user") User user) {
return "user-detail";
       }
}
9. Run the App
Conclusion:
This example is explained What is a checkbox in the Spring MVC form tag library? How to use <form:checkbox /> tag? How to use a for loop in the JSP?