Last updated on February 18th, 2025
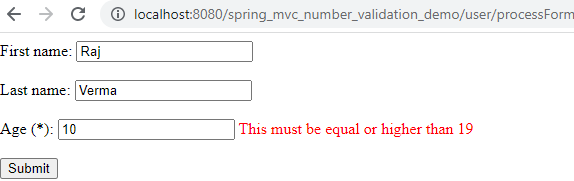
In this example, we can validate user input within this number range of 19 to 59. We can use these @Min() and @Max() annotations.
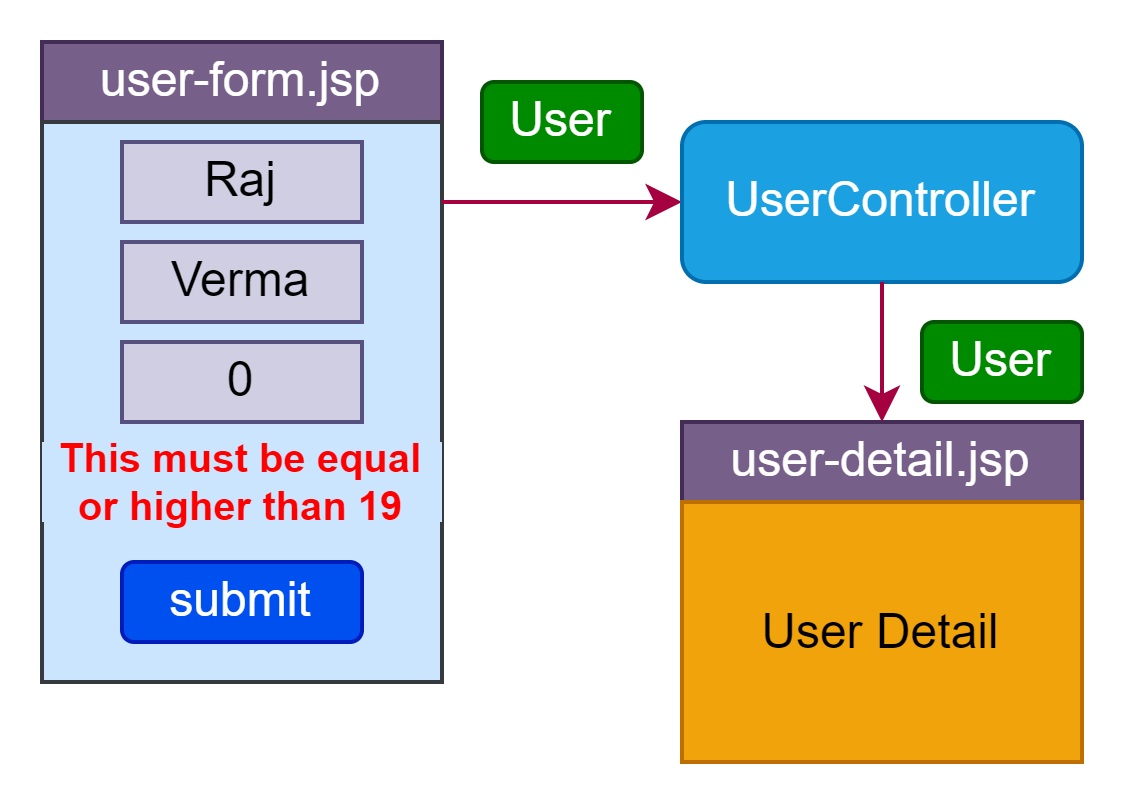
In this example the application validating age field when entering this field value is less than 59 and above than 19. Then this value is not range because the range of age is between 19 to 59.
Development Process of Number Validation
1. Keep Eclipse IDE ready
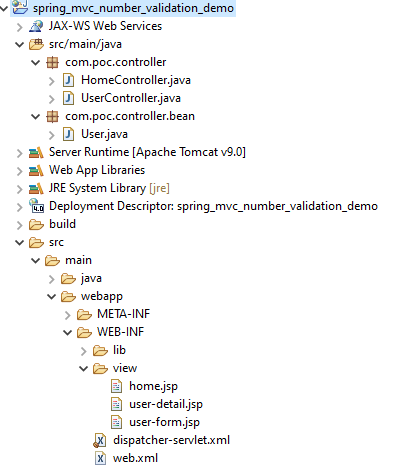
2. Project Structure
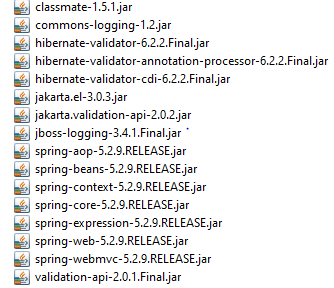
3. Add the jar file
4. Configure Spring DispacherServlet
5. Add configuration to a file
6. Create Bean Class
7. Create a View Page
8. Create Controller Class
9. Run the App
1. Keep Eclipse IDE ready
2. Project Structure
3. Add the jar file
4. Configure Spring DispacherServlet
web.xml
<?xml version="1.0" encoding="UTF-8"?>
<web-app xmlns:xsi="http://www.w3.org/2001/XMLSchema-instance"
xmlns="http://xmlns.jcp.org/xml/ns/javaee"
xsi:schemaLocation="http://xmlns.jcp.org/xml/ns/javaee http://xmlns.jcp.org/xml/ns/javaee/web-app_4.xsd"id="WebApp_ID" version="4.0">


<display-name>spring-mvc-number-validation-demo</display-name>

<absolute-ordering />
<!-- Spring MVC Configs -->
<!--  Configure Spring MVC Dispatcher Servlet -->
<servlet>
<servlet-name>dispatcher</servlet-name>
<servlet-class>org.springframework.web.servlet.DispatcherServlet</servlet-class>
<init-param>
<param-name>contextConfigLocation</param-name>
<param-value>/WEB-INF/dispatcher-servlet.xml</param-value>
</init-param>
<load-on-startup>1</load-on-startup>
</servlet>
<!-- Set up URL mapping for Spring MVC Dispatcher Servlet -->
<servlet-mapping>
<servlet-name>dispatcher</servlet-name>
<url-pattern>/</url-pattern>
</servlet-mapping>
</web-app>
→ This file is created in the WEB-INF directory of the application(spring_mvc_number_validation_demo).
5. Add configuration to file
dispatcher-servlet.xml
<?xml version="1.0" encoding="UTF-8"?>
<beans xmlns="http://www.springframework.org/schema/beans"
xmlns:xsi="http://www.w3.org/2001/XMLSchema-instance"
xmlns:context="http://www.springframework.org/schema/context"
xmlns:mvc="http://www.springframework.org/schema/mvc"
xsi:schemaLocation="http://www.springframework.org/schema/beans
http://www.springframework.org/schema/beans/spring-beans.xsd
http://www.springframework.org/schema/context
http://www.springframework.org/schema/context/spring-context.xsd
http://www.springframework.org/schema/mvc
http://www.springframework.org/schema/mvc/spring-mvc.xsd">


<!-- Add support for component scanning -->
<context:component-scan base-package="com.poc" />
<!-- Add support for conversion, formatting and validation support -->
<mvc:annotation-driven/>
<!-- Define Spring MVC view resolver -->
<bean class="org.springframework.web.servlet.view.InternalResourceViewResolver">
<property name="prefix" value="/WEB-INF/view/" />
<property name="suffix" value=".jsp" />
</bean>
</beans>
6. Create Bean Class
User.java
package com.poc.controller.bean;

import javax.validation.constraints.Max;
import javax.validation.constraints.Min;


public class User {
private String firstName;
private String lastName;
@Min(value = 19, message = "This must be equal or higher than 19")
@Max(value = 59, message = "This must be equal or not higher than 59")
private int age;

public User() {

}

public String getFirstName() {

return firstName;
}

public void setFirstName(String firstName) {

this.firstName = firstName;
}

public String getLastName() {
return lastName;
}


public void setLastName(String lastName) {
this.lastName = lastName;
}

public int getAge() {
return age;

}

public void setAge(int age) {
this.age = age;
      }
}
→ Add age validation rule in this bean class we are using @Min(value = 19, message = “This must be equal or higher than 19”) and@Max(value = 59, message = “This must be equal or not higher than 59” )are validating field user can input between 19 to 59 range if a failed message is displayed.
7. Create View Page
home.jsp
<%@ page language="java" contentType="text/html; charset=ISO-8859-1"
pageEncoding="ISO-8859-1"%>
<!DOCTYPE html>
<html>
<head>
<body>
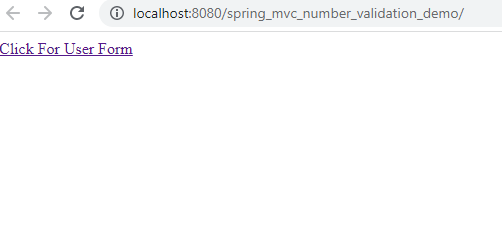
<a href="http://localhost:8080/spring_mvc_regular_expression_validation_demo/user/showForm" >Click For User Form</a>
</body>
</html>user-form.jsp
<%@ taglib prefix="form" uri="http://www.springframework.org/tags/form"%>
<!DOCTYPE html>
<html>
	<head>
		<title>User Registration Form</title>
		<style>

.error {color:red}

</style>
	</head>
	<body>
		<form:form action="processForm" modelAttribute="user">

First name:
			<form:input path="firstName" />
			<br>
				<br>

Last name:
					<form:input path="lastName" />
					<br>
						<br>

  Password (*):
							<form:password path="password" />
							<form:errors path="password" cssClass="error" />
							<br>
								<br>
									<input type="submit" value="Submit" />
								</form:form>
							</body>
</html>- <form:errors path=”password” cssClass=”error” />is displaying a message when the password field is failed to validate specific pattern the rule.
user-detail.jsp
<!DOCTYPE html>
<html>
	<head>
		<title>User Detail</title>
	</head>
	<body>User Name: ${user.firstName} ${user.lastName}
		<br>

Password:${user.password}


		</body>
	</html>
8. Create Controller Class
HomeController.java
package com.poc.controller;
import org.springframework.stereotype.Controller;
import org.springframework.web.bind.annotation.RequestMapping;

@Controller
public class HomeController {

@RequestMapping("/")
public String showPage() {
return "home";

       }
}
UserController.java:
package com.poc.controller;

import javax.validation.Valid;
import org.springframework.stereotype.Controller;
import org.springframework.ui.Model;
import org.springframework.validation.BindingResult;
import org.springframework.web.bind.annotation.ModelAttribute;
import org.springframework.web.bind.annotation.RequestMapping;
import com.poc.controller.bean.User;


@Controller
@RequestMapping("/user")
public class UserController{

@RequestMapping("/showForm")
public String showForm(Model theModel) {

// create a User object
User user=new User();

theModel.addAttribute("user",user);

return "user-form";

}

@RequestMapping("/processForm")

public String processValidateAgeForm(@ModelAttribute("user") @Valid User user,BindingResult bindingResult){

if (bindingResult.hasErrors()) {

return "user-form";

}

else {

return "user-detail";

      }
   }
}
→ @Valid is applying the validation rules on the User bean class object.
→ The output of the validation is placed on the BindingResult Interface.
9. Run the App

Conclusion
This example explains how to use number validation. How do you apply validation rules to the Bean class? How can the Spring MVC tag be used?