Spring Boot provided us with an embedded server feature. Before Spring Boot we have done lots of configurations to add a server with the Spring Application development. Sometimes when configuring to add a server for our project is giving some issues lots of time is consuming to fix these issues. Spring Framework provides a solution to this issue with Spring Boot Embedded Server. There is no need to configure to ada d server with Spring Boot Application for this we can use an Embedded server. This feature helps to develop a quick Spring application through Spring Boot.
If we don’t prefer to use an embedded server we can use an external server configuration for Spring Boot Application. This depends upon our requirements.
How to change the embedded server port number in the Spring Boot Application?
We can change the embedded Server Port number in the Spring Boot Application through the “application.properties” file. The embedded Server Port number is 8080 by default running.
Table of content:
1. Keep eclipse IDE ready
2. Create a Spring Boot Starter Project for this example of the Configure Server Port(Select Spring Web dependency)
3. Create a view page
4. Create a Controller class
5. Define the server port in the application.properties file for this example of the Configure Server Port
6. Run the Project
1. Keep eclipse IDE ready
2. Create a Spring Boot Starter Project for this example of the Configure Server Port(Select Spring Web dependency)
Maven Dependency
 <?xml version="1.0" encoding="UTF-8"?>
<project
xmlns="http://maven.apache.org/POM/4.0.0" xmlns:xsi="http://www.w3.org/2001/XMLSchema-instance"
	xsi:schemaLocation="http://maven.apache.org/POM/4.0.0 https://maven.apache.org/xsd/maven-4.0.0.xsd">
	<modelVersion>4.0.0</modelVersion>
	<parent>
		<groupId>org.springframework.boot</groupId>
		<artifactId>spring-boot-starter-parent</artifactId>
		<version>2.6.2</version>
		<relativePath/> <!-- lookup parent from repository -->
	</parent>
	<groupId>com.example</groupId>
	<artifactId>SpringBootWithSpringMVC</artifactId>
	<version>0.0.1-SNAPSHOT</version>
	<packaging>war</packaging>
	<name>SpringBootWithSpringMVC</name>
	<description>Demo project for Spring Boot</description>
	<properties>
		<java.version>1.8</java.version>
	</properties>
	<dependencies>
		<dependency>
			<groupId>org.springframework.boot</groupId>
			<artifactId>spring-boot-starter-web</artifactId>
		</dependency>
		<dependency>
			<groupId>org.springframework.boot</groupId>
			<artifactId>spring-boot-starter-tomcat</artifactId>
			<scope>provided</scope>
		</dependency>
		<dependency>
            <groupId>org.apache.tomcat.embed</groupId>
            <artifactId>tomcat-embed-jasper</artifactId>
        </dependency>
		<dependency>
			<groupId>org.springframework.boot</groupId>
			<artifactId>spring-boot-starter-test</artifactId>
			<scope>test</scope>
		</dependency>
	</dependencies>
	<build>
		<plugins>
			<plugin>
				<groupId>org.springframework.boot</groupId>
				<artifactId>spring-boot-maven-plugin</artifactId>
			</plugin>
		</plugins>
	</build>
</project>
3. Create a view page
home.jsp
<%@ page language="java" contentType="text/html; charset=ISO-8859-1"
pageEncoding="ISO-8859-1"%>
<!DOCTYPE html>
<html>
<head>
<meta charset="ISO-8859-1">
<body>
<b> Hello Spring Boot App</b>
</body>
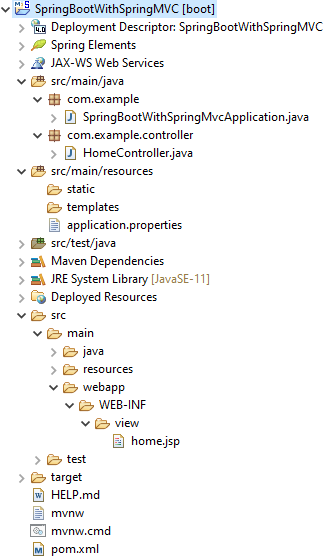
</html>Note: Create under the “WEB-INF/view” folder.
4. Create a Controller class
HomeController.java
package com.example.controller;

import org.springframework.stereotype.Controller;
import org.springframework.web.bind.annotation.GetMapping;

@Controller
public class HomeController {
	@GetMapping("/")
	public String msg() {
     //return a view page name
     return"home";
	}
}
→ @Controller annotation is to make normal as Controller class. This is the stereotype annotation. Stereotype annotation is giving a special role to the class as we use this “@Controller” annotation for the “HomeController” class to act as the Controller of this project.
→ This is the controller class with mapping i.e., @GetMapping(“/”). The mapping returns the view i.e., home.This “home” is a view page(home.jsp). The location the of view page is under “src\main\webapp\WEB-INF\view\” in the project.
5. Define the server port in the application.properties file for this example of the Configure Server Port
application.properties
# the servlet path
server.servlet.context-path= /demo_mvc
# MVC view prefix
spring.mvc.view.prefix=/WEB-INF/view/
# MVC view suffix
spring.mvc.view.suffix=.jsp
#Server port
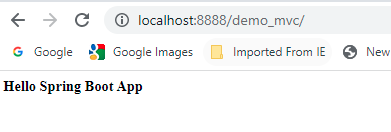
server.port=8888Note: server.port=number number: We can modify embedded the server port. In this port number, our project is running when we run our project.
→ Now our project is run with this port of the Server and the URL “http://localhost:8888/demo_mvc/”.
6. Run the Project
Right-click on this java class i.e., SpringBootWithSpringMvcApplication(automatic generated main class) of this project then click Run as Java Application
→ See the console Embedded Tomcat Server is started on Port number 8888. Go to the web browser and type the “http://localhost:8888/demo_mvc/”.
Output
Conclusion
This example is explained:
• How to change the embedded server port number?
• How can we check on which port number the embedded server is started?