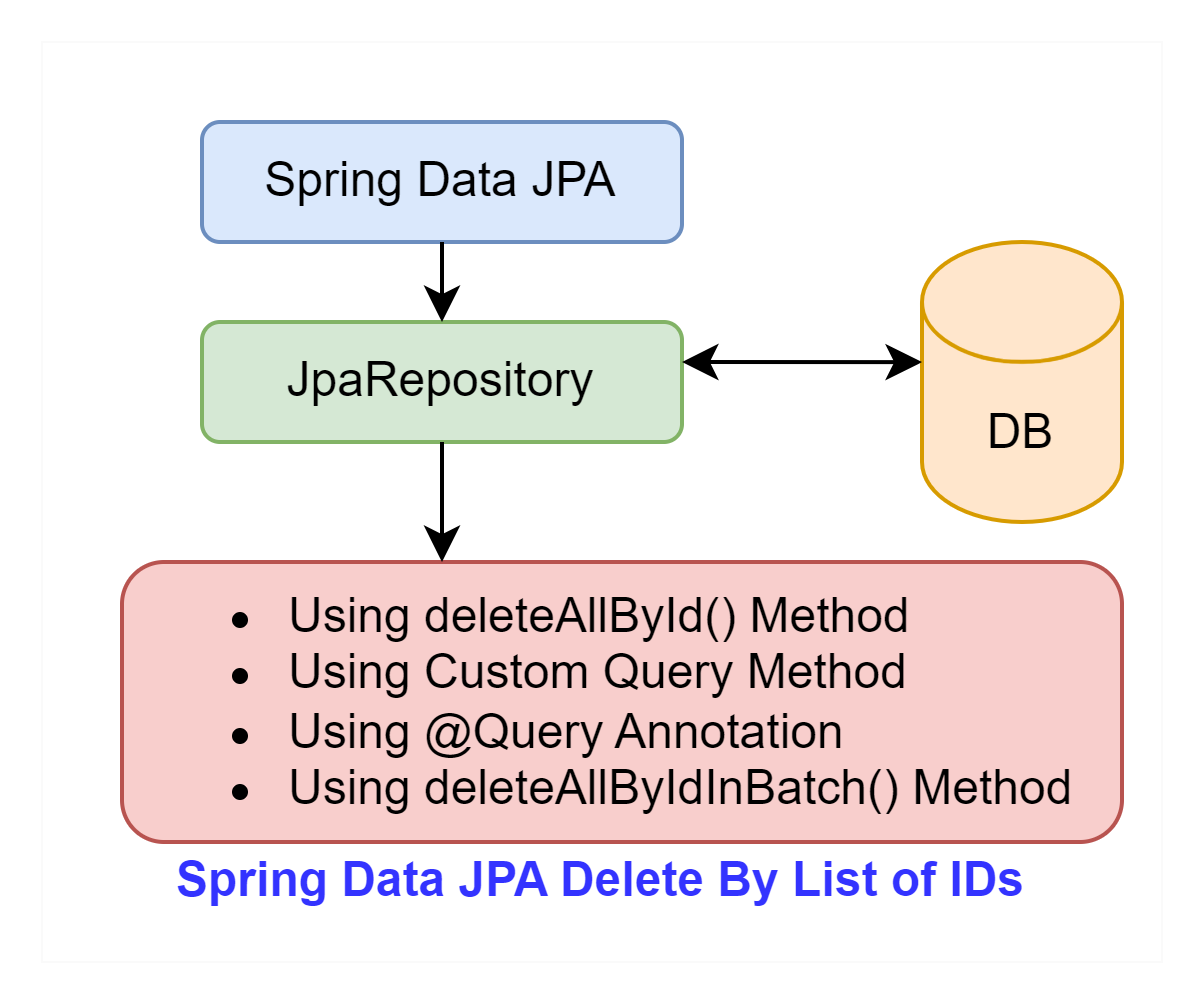
Using Spring Data JPA we can delete by the list of IDs using query methods, a custom query method with an In keyword and @Query annotation with the custom method. We delete records by list of IDs from the database table using the deleteAllById() and deleteAllByIdInBatch() query methods of the JPA Repository. We can add a custom query method with delete or remove and In keywords in the repository interface. We can add a custom method with @Query annotation through JPQL or native SQL query in the repository interface that extends the JpaRepository interface. In this topic, we will learn how to delete records by list IDs using Spring Data JPA.
Why Delete by List of IDs?
Sometimes in our application, we may have a scenario where we need to delete multiple records based on the list of IDs from the database table. For instance, consider an application that manages a list of user records. If we want to delete several users simultaneously, performing this operation within a single database transaction is more efficient than boilerplate codes for deleting bulk records.
There are several methods to use to delete records based on a list of IDs which are mentioned below:
1. Using deleteAllById() Method
We can delete records by the list of IDs from the database table using this deleteAllById() query method of Spring Data JPA. To use this method, we must create a repository interface that extends the JpaRepository interface. It will execute multiple queries to delete multiple user records from the database.
public interface UserRepository extends JpaRepository<User, Long> {

}
To call that query method create a Service class and then call that method.
@Service

public class UserServiceImpl implements UserService {

  @Autowired

  private UserRepository userRepo;

  @Override

  public void deleteUserByListIds(List < Long > ids) {

    userRepo.deleteAllById(ids);

  }

}
2. Using Custom Query Method
In the repository interface, we need to add a custom query method that prefixes with delete or remove keywords add any word if needed is optionally followed By a keyword then add the Id field followed by the In after that add the parameter argument type for the method such as delete…ByIdIn(Parameter parameter). It will execute multiple delete queries to delete multiple user records from the database.
public interface UserRepository extends JpaRepository<User, Long> {
@Transactional
void deleteUserByIdIn(List<Long> Ids);
}- This @Transactional annotation helps to execute this method.
3. Using @Query Annotation
Add a custom method with @Query annotation in the repository interface. This annotation allows us to define a delete query with the IN operator using JPQL or native SQL query. Using the IN operator we can delete records by the list of IDs with a delete query. It will execute a single delete query to delete multiple user records from the database.
public interface UserRepository extends JpaRepository < User, Long > {

  @Modifying

  @Transactional

  @Query("DELETE FROM User usr WHERE usr.id IN :ids")

  void userDeleteByIds(List < Long > ids);

}- This @Modifying annotation allows us to modify the operations(INSERT, DELETE and UPDATE).
4. Using deleteAllByIdInBatch() Method
To delete records by the list of IDs using the deleteAllByIdInBatch() query method of the Spring Data JPA. Create a repository interface that extends the JpaRepository interface of Spring Data JPA. It executes a single delete query to delete multiple user records from the database.
public interface UserRepository extends JpaRepository<User, Long> {

}
Create a Service class to call this query method for deleting records by the list of IDs.
@Service

public class UserServiceImpl implements UserService {

  @Autowired

  private UserRepository userRepo;

  @Override

  public void deleteByIdsBatch(List < Long > ids) {

    userRepo.deleteAllByIdInBatch(ids);

  }
Step-by-Step Guide to Delete by List of IDs
Let’s make a Spring Boot Application step-by-step guide to implement delete by list of IDs using methods that are mentioned above.
These are the following steps:
- Create Spring Boot Project
- Setup in the IDE
- Configure H2 Database
- Create a JPA Entity
- Create a Repository Interface
- Create a Service Interface
- Implement the Service Interface
- Create a Controller
- Run the Spring Boot Application
1. Create Spring Boot Project
We are creating a Spring Boot Project from the web tool Spring Initializr. Provide details for the project and select the following Maven dependencies:
- Spring Web
- Spring Data JPA
- H2 Database
- Lombok
2. Setup in the IDE
We use Eclipse IDE to set up and configure the created Spring Boot Project. You can use other IDE such as STS, IntelliJ IDEA, etc.
Project Structure of Spring Boot
This image shows the project structure of Spring Boot in Eclipse IDE.

Maven Dependency
Here is the complete maven dependencies file pom.xml for the project.
pom.xml
<?xml version="1.0" encoding="UTF-8"?>
<project
	xmlns="http://maven.apache.org/POM/4.0.0"
	xmlns:xsi="http://www.w3.org/2001/XMLSchema-instance"

xsi:schemaLocation="http://maven.apache.org/POM/4.0.0 https://maven.apache.org/xsd/maven-4.0.0.xsd">
	<modelVersion>4.0.0</modelVersion>
	<parent>
		<groupId>org.springframework.boot</groupId>
		<artifactId>spring-boot-starter-parent</artifactId>
		<version>3.3.0</version>
		<relativePath/>
		<!-- lookup parent from repository -->
	</parent>
	<groupId>com.springjava</groupId>
	<artifactId>demo</artifactId>
	<version>0.0.1-SNAPSHOT</version>
	<name>demo</name>
	<description>Demo project for Spring Boot</description>
	<properties>
		<java.version>17</java.version>
	</properties>
	<dependencies>
		<dependency>
			<groupId>org.springframework.boot</groupId>
			<artifactId>spring-boot-starter-data-jpa</artifactId>
		</dependency>
		<dependency>
			<groupId>org.springframework.boot</groupId>
			<artifactId>spring-boot-starter-web</artifactId>
		</dependency>
		<dependency>
			<groupId>com.h2database</groupId>
			<artifactId>h2</artifactId>
			<scope>runtime</scope>
		</dependency>
		<dependency>
			<groupId>org.projectlombok</groupId>
			<artifactId>lombok</artifactId>
			<optional>true</optional>
		</dependency>
		<dependency>
			<groupId>org.springframework.boot</groupId>
			<artifactId>spring-boot-starter-test</artifactId>
			<scope>test</scope>
		</dependency>
	</dependencies>
	<build>
		<plugins>
			<plugin>
				<groupId>org.springframework.boot</groupId>
				<artifactId>spring-boot-maven-plugin</artifactId>
				<configuration>
					<excludes>
						<exclude>
							<groupId>org.projectlombok</groupId>
							<artifactId>lombok</artifactId>
						</exclude>
					</excludes>
				</configuration>
			</plugin>
		</plugins>
	</build>
</project>
3. Configure H2 Database
We are configuring the H2 database connection in the application.properties file.
application.properties
#H2 Database Configuration
spring.datasource.url=jdbc:h2:mem:test
spring.datasource.username=sa
spring.datasource.password=
spring.jpa.show-sql=true
spring.jpa.properties.hibernate.dialect=org.hibernate.dialect.H2Dialect
spring.jpa.hibernate.ddl-auto=update
spring.h2.console.enabled=true
4. Create a JPA Entity
Let’s create a JPA Entity class. For example, consider a User entity and use Lombok for generating setter and getter methods, a constructor, etc.
User.java
package com.springjava.entity;

import jakarta.persistence.Entity;

import jakarta.persistence.GeneratedValue;

import jakarta.persistence.GenerationType;

import jakarta.persistence.Id;

import jakarta.persistence.Table;

import lombok.Data;

@Data

@Entity

@Table(name = "user_tbl")

public class User {

  @Id

  @GeneratedValue(strategy = GenerationType.IDENTITY)

  private Long id;

  private String name;

  private String email;

  private boolean active;

}
5. Create a Repository Interface
Create a repository interface for the User JPA Entity class that interface extends the JpaRepository interface to perform persistence operations on the user_tbl database table.
UserRepository.java
package com.springjava.repository;

import java.util.List;

import org.springframework.data.jpa.repository.JpaRepository;

import org.springframework.data.jpa.repository.Modifying;

import org.springframework.data.jpa.repository.Query;

import com.springjava.entity.User;

import jakarta.transaction.Transactional;

public interface UserRepository extends JpaRepository < User, Long > {

  @Transactional

  void deleteUserByIdIn(List < Long > Ids);

  @Modifying

  @Transactional

  @Query("DELETE FROM User usr WHERE usr.id IN :ids")

  void userDeleteByIds(List < Long > ids);

}- @Modifying annotation allows us to modify queries and increase the capability of @Query annotation.
- @Query annotation allows us to define the query using JPQL and Native SQL queries.
- @Transactional annotation allows us to execute a query within the transaction.
6. Create a Service Interface
Create a Service interface UserService with some method declaration.
UserService.java
package com.springjava.service;

import java.util.List;

import com.springjava.entity.User;

public interface UserService {

  void saveAll(List < User > userList);

  void deleteByIds(List < Long > ids);

  void deleteUserByListIds(List < Long > ids);

  void deleteUserByIds(List < Long > ids);

  void deleteByIdsBatch(List < Long > ids);

}
7. Implement the Service Interface
Implement the UserService interface in the UserServiceImpl class. This class is annotated with @Service annotation.
UserServiceImpl.java
package com.springjava.service;

import java.util.List;

import org.springframework.beans.factory.annotation.Autowired;

import org.springframework.stereotype.Service;

import com.springjava.entity.User;

import com.springjava.repository.UserRepository;

@Service

public class UserServiceImpl implements UserService {

  @Autowired

  private UserRepository userRepo;

  @Override

  public void saveAll(List < User > userList) {

    userRepo.saveAll(userList);

  }

  @Override

  public void deleteUserByListIds(List < Long > ids) {

    userRepo.deleteAllById(ids);

  }

  @Override

  public void deleteUserByIds(List < Long > ids) {

    userRepo.userDeleteByIds(ids);

  }

  @Override

  public void deleteByIds(List < Long > ids) {

    userRepo.deleteUserByIdIn(ids);

  }

  @Override

  public void deleteByIdsBatch(List < Long > ids) {

    userRepo.deleteAllByIdInBatch(ids);

  }

}
8. Create a Controller
Create a controller class UserController. This is annotated with @RestController to make this class a RestController.
UserController.java
package com.springjava.controller;

import java.util.Arrays;

import java.util.LinkedHashMap;

import java.util.List;

import java.util.Map;

import org.springframework.beans.factory.annotation.Autowired;

import org.springframework.http.HttpStatus;

import org.springframework.http.ResponseEntity;

import org.springframework.web.bind.annotation.DeleteMapping;

import org.springframework.web.bind.annotation.PostMapping;

import org.springframework.web.bind.annotation.RequestBody;

import org.springframework.web.bind.annotation.RequestMapping;

import org.springframework.web.bind.annotation.RestController;

import com.springjava.entity.User;

import com.springjava.service.UserService;

@RestController

@RequestMapping("/api/user")

public class UserController {

  @Autowired

  private UserService userService;

  @PostMapping("/save-all")

  public ResponseEntity < ? > save(@RequestBody List < User > users) {

    Map < String, Object > respUser = new LinkedHashMap < String, Object > ();

    userService.saveAll(users);

    respUser.put("status", 1);

    respUser.put("message", "Record is Saved Successfully!");

    return new ResponseEntity < > (respUser, HttpStatus.CREATED);

  }

  @DeleteMapping("/delete-query-method")

  public ResponseEntity < ? > deleteUserByListIds() {

    Map < String, Object > respUser = new LinkedHashMap < String, Object > ();

    List < Long > ids = Arrays.asList(1 L, 2 L);

    userService.deleteUserByListIds(ids);

    respUser.put("status", 1);

    respUser.put("data", "Record deleted successfully!");

    return new ResponseEntity < > (respUser, HttpStatus.OK);

  }

  @DeleteMapping("/delete-custom-query-method")

  public ResponseEntity < ? > deleteByIds() {

    Map < String, Object > respUser = new LinkedHashMap < String, Object > ();

    List < Long > ids = Arrays.asList(3 L, 4 L);

    userService.deleteByIds(ids);

    respUser.put("status", 1);

    respUser.put("data", "Record deleted successfully!");

    return new ResponseEntity < > (respUser, HttpStatus.OK);

  }

  @DeleteMapping("/delete-batch-id")

  public ResponseEntity < ? > deleteBatchIds() {

    Map < String, Object > respUser = new LinkedHashMap < String, Object > ();

    List < Long > ids = Arrays.asList(5 L, 6 L);

    userService.deleteUserByIds(ids);

    respUser.put("status", 1);

    respUser.put("data", "Record deleted successfully!");

    return new ResponseEntity < > (respUser, HttpStatus.OK);

  }

  @DeleteMapping("/delete-custom-method")

  public ResponseEntity < ? > deleteUserByIds() {

    Map < String, Object > respUser = new LinkedHashMap < String, Object > ();

    List < Long > ids = Arrays.asList(7 L, 8 L);

    userService.deleteUserByIds(ids);

    respUser.put("status", 1);

    respUser.put("data", "Record deleted successfully!");

    return new ResponseEntity < > (respUser, HttpStatus.OK);

  }

}
9. Run the Spring Boot Application
Right-click this Spring Boot application on the DemoApplication.java, then click Run As and select Java Application.
H2 Database Console
If we want to check the H2 database console then we need to browse this url “http://localhost:8080/h2-console” on the browser.
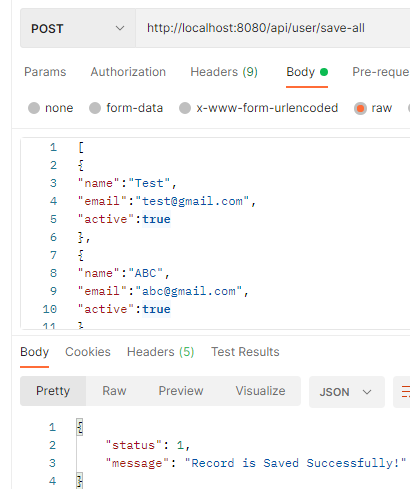
JSON Array
We are creating a sample JSON Array to test the API http://localhost:8080/api/user/save-all.
[
  {
    "name": "Test",
    "email": "test@gmail.com",
    "active": true
  },
  {
    "name": "ABC",
    "email": "abc@gmail.com",
    "active": true
  },
  {
    "name": "DEF",
    "email": "def@gmail.com",
    "active": true
  },
  {
    "name": "XYZ",
    "email": "xyz@gmail.com",
    "active": true
  },
  {
    "name": "PQR",
    "email": "pqr@gmail.com",
    "active": true
  },
  {
    "name": "JKL",
    "email": "jkl@gmail.com",
    "active": true
  },
  {
    "name": "MNO",
    "email": "mno@gmail.com",
    "active": false
  },
  {
    "name": "WYZ",
    "email": "wyz@gmail.com",
    "active": false
  }
]
Test the APIs on the Postman Tool
POST: http://localhost:8080/api/user/save-all
DELETE: http://localhost:8080/api/user/delete-query-method
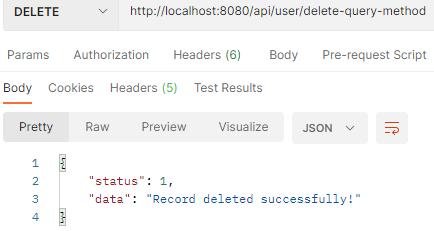
This API hits then Spring Data JPA (internally uses Hibernate as a JPA provider) generates SQL statement in the console below here:
Hibernate: select u1_0.id,u1_0.active,u1_0.email,u1_0.name from user_tbl u1_0 where u1_0.id=?
Hibernate: select u1_0.id,u1_0.active,u1_0.email,u1_0.name from user_tbl u1_0 where u1_0.id=?
Hibernate: delete from user_tbl where id=?
Hibernate: delete from user_tbl where id=?
DELETE: http://localhost:8080/api/user/delete-custom-query-method
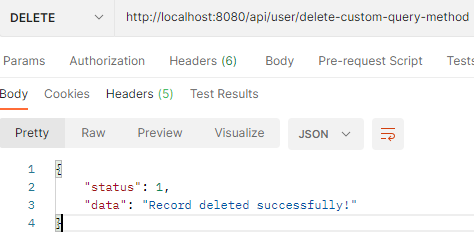
This API hits then Spring Data JPA (internally uses Hibernate as a JPA provider) generates SQL statement in the console below here:
Hibernate: select u1_0.id,u1_0.active,u1_0.email,u1_0.name from user_tbl u1_0 where u1_0.id in (?,?)
Hibernate: delete from user_tbl where id=?
Hibernate: delete from user_tbl where id=?
DELETE: http://localhost:8080/api/user/delete-batch-id
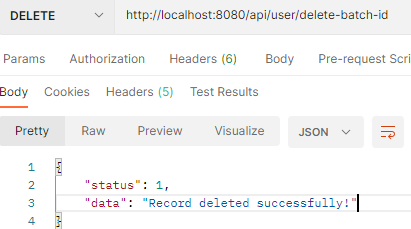
This API hits then Spring Data JPA (internally uses Hibernate as a JPA provider) generates SQL statement in the console below here:
Hibernate: delete from user_tbl u1_0 where u1_0.id in (?,?)DELETE: http://localhost:8080/api/user/delete-custom-method
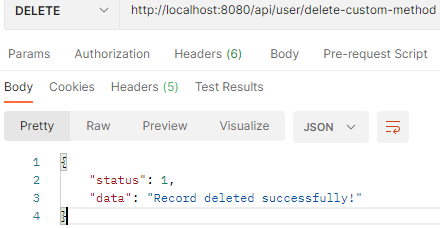
This API hits then Spring Data JPA (internally uses Hibernate as a JPA provider) generates SQL statement in the console below here:
Hibernate: delete from user_tbl u1_0 where u1_0.id in (?,?)Conclusion
Delete multiple records by the list of IDs using Spring Data JPA through the Spring Boot application with REST API. By JpaRepository of Spring Data JPA, we can use various methods for deleting bulk records while avoiding boilerplate codes and enhancing the performance of our application by a minimal number of database transactions.
I like this blog very much, Its a rattling nice position to read and find info . “Famous remarks are very seldom quoted correctly.” by Simeon Strunsky.