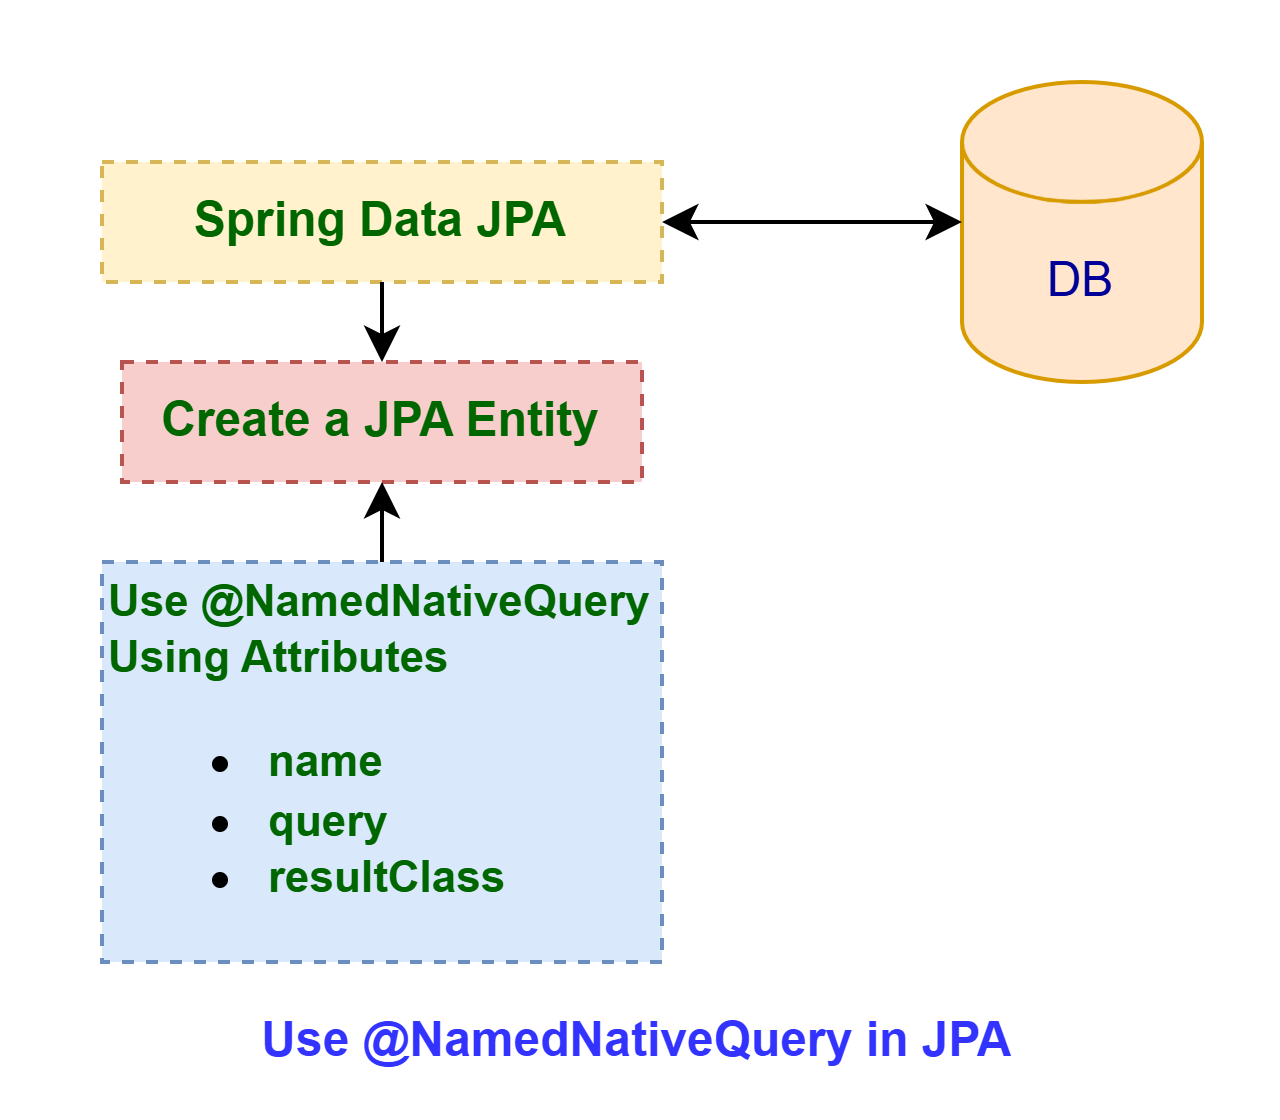
The @NamedNativeQuery annotation in JPA allows us to specify native SQL queries directly in the JPA Entity class and execute them by name. This annotation is used when we need to execute complex SQL queries that cannot be easily expressed using the JPQL. To use @NamedNativeQuery in JPA first we must create a JPA entity class and then need to use @NamedNativeQuery annotation with its name, query and resultClass attributes to define native sql in that entity class. The name attribute is used to define the unique name for the query, the query attribute is used to define the native SQL query and the resultClass attribute is used to define the entity or DTO class. In this topic, we will explain how to use @NamedNativeQuery in JPA using the Spring Boot application.
What is @NamedNativeQuery in JPA?
The @NamedNativeQuery is an annotation used to define a native SQL query with a unique name.
Features of @NamedNativeQuery
- It allows writing raw SQL queries.
- It supports mapping query results to entity classes or custom DTOs.
- It provides reusability by defining queries once and executing them multiple times.
Syntax of @NamedNativeQuery
Here’s the general syntax for @NamedNativeQuery annotation:
@NamedNativeQuery(
name = "queryName",
query = "SQL query here",
resultClass = EntityName.class
)- name: Defines the unique name for the query.
- query: Defines the raw SQL query.
- resultClass: Specifies the entity or DTO class for mapping query results.
Use @NamedNativeQuery in JPA
There are the following steps to use @NamedNativeQuery in JPA:
1. Create a JPA Entity
Create a Java Bean class annotated with @Entity annotation to make that class a JPA Entity class.
Example
@Entity
@Data
public class Orders {
@Id
@GeneratedValue(strategy = GenerationType.IDENTITY)
private Long id;
private String product;
private double price;
private String status;
}
2. Use @NamedNativeQuery annotation
Use this annotation in the created entity class Orders.
Example
@Entity
@Data
@NamedNativeQuery(
name = "findOrdersByStatus",
query = "SELECT * FROM orders WHERE status = :status",
resultClass = Orders.class
)

public class Orders {
@Id
@GeneratedValue(strategy = GenerationType.IDENTITY)
private Long id;
private String product;
private double price;
private String status;
}- In the above, we used @NamedNativeQuery annotation to fetch orders based on a custom SQL query.
- name = “findOrdersByStatus”: is the unique name for the query.
- query = “SELECT * FROM orders WHERE status = :status”: The native SQL query with a parameterized.
- resultClass = Orders.class: Specifies that the query result should be mapped to the Orders entity.
3. Executing @NamedNativeQuery in Code
We can execute @NamedNativeQuery’s native SQL query using the EntityManager.
Example
@Service
public class OrderServiceImpl implements OrderService {
@PersistenceContext
private EntityManager entityManager;

@Override
public List<Orders> getOrdersByStatus(String status) {
Query query = entityManager.createNamedQuery("findOrdersByStatus");
query.setParameter("status", status);
return query.getResultList();
    }
}- The @PersistenceContext annotation takes care of creating a unique EntityManager for every transaction (communication with the database).
- createNamedQuery: Executes the query by its name.
- setParameter(“status”, status): Sets the value for the parameter in the query.
- getResultList(): Returns the list of results mapped to the entity.
Use @NamedNativeQuery with other conditions
We can use @NamedNativeQuery with other conditions to make a native SQL query in the Entity class.
Example
@NamedNativeQuery(
name = "findOrdersByPriceRange",
query = "SELECT * FROM orders WHERE price BETWEEN :minPrice AND :maxPrice",
resultClass = Orders.class
)
Execution of @NamedNativeQuery
public List<Orders> getOrdersByPriceRange(double minPrice, double maxPrice) {
Query query = entityManager.createNamedQuery("findOrdersByPriceRange");
query.setParameter("minPrice", minPrice);
query.setParameter("maxPrice", maxPrice);
return query.getResultList();
}
Using @NamedNativeQuery for mapping DTO
We can map the results of a @NamedNativeQuery to a custom DTO instead of an entity using the SqlResultSetMapping annotation. This annotation is used in Class-based DTO with Native Query to return DTO.
Example: Mapping DTO
@Data
@AllArgsConstructor
public class OrderDTO {
private String product;
private double price;
}
Orders Entity with Result DTO Mapping
@Entity
@Data

@SqlResultSetMapping(
name = "OrderDTOResult",
classes = @ConstructorResult(
targetClass = OrderDTO.class,
columns = {
@ColumnResult(name = "product", type = String.class),
@ColumnResult(name = "price", type = Double.class)
}
)
)
@NamedNativeQuery(
name = "findOrderDTOsByStatus",
query = "SELECT product, price FROM orders WHERE status = :status",
resultSetMapping = "OrderDTOResult"
)
public class Orders {
@Id
@GeneratedValue(strategy = GenerationType.IDENTITY)
private Long id;
private String product;
private double price;
private String status;
}- @SqlResultSetMapping: Maps query results to a custom DTO using @ConstructorResult.
- resultSetMapping = “OrderDTOResult”: Links the query to the defined result mapping.
Execution of @NamedNativeQuery to Fetch DTO
public List<OrderDTO> getOrderDTOsByStatus(String status) {
Query query = entityManager.createNamedQuery("findOrderDTOsByStatus");
query.setParameter("status", status);
return query.getResultList();
}
Step-by-step to Guide the Use @NamedNativeQuery in JPA
Let’s create a Spring Boot Application step-by-step guide using @NamedNativeQuery annotation to define native SQL query in JPA Entity to fetch records from the database table. We will create an example that returns a list of orders to the client through the API endpoints using the mentioned ways above.
These are the following steps:
- Create Spring Boot Project
- Setup in the IDE
- Configure H2 Database
- Create a JPA Entity
- Create a Repository Interface
- Create a Service Interface
- Implement the Service Interface
- Create a Controller
- Run the Spring Boot Application
1. Create Spring Boot Project
We are creating a Spring Boot Project from the web tool Spring Initializr. By Providing details for the project and select the following Maven dependencies:
- Spring Web
- Spring Data JPA
- H2 Database
- Lombok
2. Setup in the IDE
We use Eclipse IDE to set up and configure the created Spring Boot Project. You can use other IDE to set up and configure the Spring Boot project.
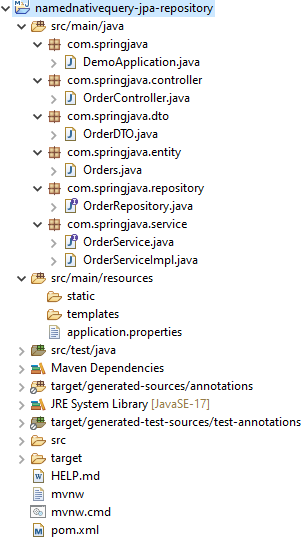
Project Structure of Spring Boot
This image shows the project structure of Spring Boot in Eclipse IDE.
Maven Dependency
Here is the complete maven dependencies file pom.xml for the project which will implement the @NamedNativeQuery in JPA using Spring Boot Application.
pom.xml
<?xml version="1.0" encoding="UTF-8"?>
<project
	xmlns="http://maven.apache.org/POM/4.0.0"
	xmlns:xsi="http://www.w3.org/2001/XMLSchema-instance"

xsi:schemaLocation="http://maven.apache.org/POM/4.0.0 https://maven.apache.org/xsd/maven-4.0.0.xsd">
	<modelVersion>4.0.0</modelVersion>
	<parent>
		<groupId>org.springframework.boot</groupId>
		<artifactId>spring-boot-starter-parent</artifactId>
		<version>3.3.0</version>
		<relativePath/>
		<!-- lookup parent from repository -->
	</parent>
	<groupId>com.springjava</groupId>
	<artifactId>demo</artifactId>
	<version>0.0.1-SNAPSHOT</version>
	<name>demo</name>
	<description>Demo project for Spring Boot</description>
	<properties>
		<java.version>17</java.version>
	</properties>
	<dependencies>
		<dependency>
			<groupId>org.springframework.boot</groupId>
			<artifactId>spring-boot-starter-data-jpa</artifactId>
		</dependency>
		<dependency>
			<groupId>org.springframework.boot</groupId>
			<artifactId>spring-boot-starter-web</artifactId>
		</dependency>
		<dependency>
			<groupId>com.h2database</groupId>
			<artifactId>h2</artifactId>
			<scope>runtime</scope>
		</dependency>
		<dependency>
			<groupId>org.projectlombok</groupId>
			<artifactId>lombok</artifactId>
			<optional>true</optional>
		</dependency>
		<dependency>
			<groupId>org.springframework.boot</groupId>
			<artifactId>spring-boot-starter-test</artifactId>
			<scope>test</scope>
		</dependency>
	</dependencies>
	<build>
		<plugins>
			<plugin>
				<groupId>org.springframework.boot</groupId>
				<artifactId>spring-boot-maven-plugin</artifactId>
				<configuration>
					<excludes>
						<exclude>
							<groupId>org.projectlombok</groupId>
							<artifactId>lombok</artifactId>
						</exclude>
					</excludes>
				</configuration>
			</plugin>
		</plugins>
	</build>
</project>
3. Configure H2 Database
We are going to configure the H2 database connection in the application.properties file.
application.properties
#H2 Database Configuration
spring.datasource.url=jdbc:h2:mem:test
spring.datasource.username=sa
spring.datasource.password=
spring.jpa.show-sql=true
spring.jpa.properties.hibernate.dialect=org.hibernate.dialect.H2Dialect
spring.jpa.hibernate.ddl-auto=update
spring.h2.console.enabled=true
4. Create a JPA Entity
Let’s create a JPA Entity class. For example, consider Orders entity and use Lombok for generating setter and getter methods, a constructor, etc.
Orders.java
package com.springjava.entity;

import com.springjava.dto.OrderDTO;
import jakarta.persistence.ColumnResult;
import jakarta.persistence.ConstructorResult;
import jakarta.persistence.Entity;
import jakarta.persistence.GeneratedValue;
import jakarta.persistence.GenerationType;
import jakarta.persistence.Id;
import jakarta.persistence.NamedNativeQuery;
import jakarta.persistence.SqlResultSetMapping;
import lombok.Data;

@Data
@Entity

@NamedNativeQuery(
name = "findOrdersByStatus",
query = "SELECT * FROM orders WHERE status = :status",
resultClass = Orders.class
)
@NamedNativeQuery(
name = "findOrdersByPriceRange",
query = "SELECT * FROM orders WHERE price BETWEEN :minPrice AND :maxPrice",
resultClass = Orders.class
)

@SqlResultSetMapping(
name = "OrderDTOResult",
classes = @ConstructorResult(
targetClass = OrderDTO.class,
columns = {
@ColumnResult(name = "product", type = String.class),
@ColumnResult(name = "price", type = Double.class)
     }
   )
)
@NamedNativeQuery(
name = "findOrderDTOsByStatus",
query = "SELECT product, price FROM orders WHERE status = :status",
resultSetMapping = "OrderDTOResult"
)

public class Orders {
@Id
@GeneratedValue(strategy = GenerationType.IDENTITY)
private Long id;
private String product;
private double price;
private String status;
}
5. Create a Repository Interface
Create a repository interface for the Orders JPA Entity class that interface extends the JpaRepository interface to perform persistence operations using query method(saveAll) on the orders database table.
OrderRepository.java
package com.springjava.repository;
import org.springframework.data.jpa.repository.JpaRepository;
import com.springjava.entity.Orders;

public interface OrderRepository extends JpaRepository<Orders, Long> {
}
6. Create a Service Interface
Create a Service interface OrderService with some method declaration.
OrderService.java
package com.springjava.service;
import java.util.List;
import com.springjava.dto.OrderDTO;
import com.springjava.entity.Orders;

public interface OrderService {
void saveAll(List<Orders>orderList);
List<Orders> getOrdersByStatus(String status);
List<Orders>getOrdersByPriceRange(double minPrice, double maxPrice);
List<OrderDTO> getOrderDTOsByStatus(String status);
}
7. Implement the Service Interface
Implement the OrderService interface in the OrderServiceImpl class. This class is annotated with @Service annotation, where we inject OrderRepository to call all its methods.
OrderServiceImpl.java
package com.springjava.service;
import java.util.List;
import org.springframework.beans.factory.annotation.Autowired;
import org.springframework.stereotype.Service;
import com.springjava.dto.OrderDTO;
import com.springjava.entity.Orders;
import com.springjava.repository.OrderRepository;
import jakarta.persistence.EntityManager;
import jakarta.persistence.PersistenceContext;
import jakarta.persistence.Query;

@Service
public class OrderServiceImpl implements OrderService {
@Autowired
private OrderRepository orderRepo;
@PersistenceContext
private EntityManager entityManager;

@Override
public void saveAll(List<Orders> orderList) {
orderRepo.saveAll(orderList);
}

@SuppressWarnings("unchecked")
@Override
public List<Orders> getOrdersByStatus(String status) {
Query query = entityManager.createNamedQuery("findOrdersByStatus");
query.setParameter("status", status);
return query.getResultList();
}

@SuppressWarnings("unchecked")
@Override
public List<Orders> getOrdersByPriceRange(double minPrice, double maxPrice) {
Query query = entityManager.createNamedQuery("findOrdersByPriceRange");
query.setParameter("minPrice", minPrice);
query.setParameter("maxPrice", maxPrice);
return query.getResultList();
}

@SuppressWarnings("unchecked")
@Override
public List<OrderDTO> getOrderDTOsByStatus(String status) {
Query query = entityManager.createNamedQuery("findOrderDTOsByStatus");
query.setParameter("status", status);
return query.getResultList();
   }
}
8. Create a Controller
Create a controller class OrderController. This is annotated with @RestController to make this class a RestController.
OrderController.java
package com.springjava.controller;
import java.util.LinkedHashMap;
import java.util.List;
import java.util.Map;
import org.springframework.beans.factory.annotation.Autowired;
import org.springframework.http.HttpStatus;
import org.springframework.http.ResponseEntity;
import org.springframework.web.bind.annotation.GetMapping;
import org.springframework.web.bind.annotation.PostMapping;
import org.springframework.web.bind.annotation.RequestBody;
import org.springframework.web.bind.annotation.RequestMapping;
import org.springframework.web.bind.annotation.RestController;
import com.springjava.dto.OrderDTO;
import com.springjava.entity.Orders;
import com.springjava.service.OrderService;

@RestController
@RequestMapping("/api/order")

public class OrderController {
@Autowired
private OrderService orderService;

@PostMapping("/save-all")
public ResponseEntity<?> save(@RequestBody List<Orders> orderList) {
Map<String, Object> respOrder = new LinkedHashMap<String, Object>();
orderService.saveAll(orderList);
respOrder.put("status", 1);
respOrder.put("message", "Record is Saved Successfully!");
return new ResponseEntity<>(respOrder, HttpStatus.CREATED);
}

@GetMapping("/orders-by-status")
public ResponseEntity<?> getOrdersByStatus() {
Map<String, Object> respOrder = new LinkedHashMap<String, Object>();
List<Orders> orderList= orderService.getOrdersByStatus("PENDING");
if (!orderList.isEmpty()) {
respOrder.put("status", 1);
respOrder.put("data", orderList);
return new ResponseEntity<>(respOrder, HttpStatus.OK);
} else {
respOrder.clear();
respOrder.put("status", 0);
respOrder.put("message", "Data is not found");
return new ResponseEntity<>(respOrder, HttpStatus.NOT_FOUND);
 }
}

@GetMapping("/orders-by-price-range")
public ResponseEntity<?> getOrdersByPriceRange() {
Map<String, Object> respOrder = new LinkedHashMap<String, Object>();
List<Orders> orderList= orderService.getOrdersByPriceRange(1700, 2000);
if (!orderList.isEmpty()) {
respOrder.put("status", 1);
respOrder.put("data", orderList);
return new ResponseEntity<>(respOrder, HttpStatus.OK);
} else {
respOrder.clear();
respOrder.put("status", 0);
respOrder.put("message", "Data is not found");
return new ResponseEntity<>(respOrder, HttpStatus.NOT_FOUND);
   }
}

@GetMapping("/orders-dto-by-status")
public ResponseEntity<?> getOrderDTOsByStatus() {
Map<String, Object> respOrder = new LinkedHashMap<String, Object>();
List<OrderDTO> orderList= orderService.getOrderDTOsByStatus("COMPLETED");
if (!orderList.isEmpty()) {
respOrder.put("status", 1);
respOrder.put("data", orderList);
return new ResponseEntity<>(respOrder, HttpStatus.OK);
} else {
respOrder.clear();
respOrder.put("status", 0);
respOrder.put("message", "Data is not found");
return new ResponseEntity<>(respOrder, HttpStatus.NOT_FOUND);
   }
 }
}
9. Run the Spring Boot Application
Right-click this Spring Boot application on the DemoApplication.java, then click Run As and select Java Application.
H2 Database Console
To check the H2 database console we need to browse the URL “http://localhost:[server_port]/h2-console” on the browser.
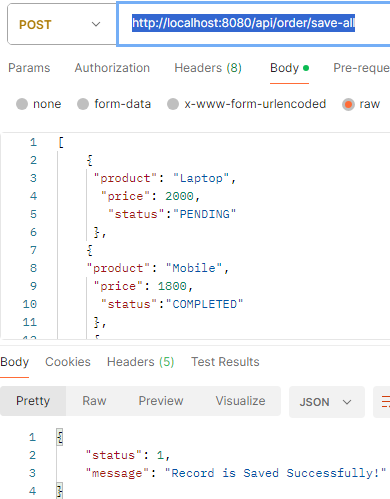
JSON Array
We are creating a sample JSON Array to test the API http://localhost:8080/api/order/save-all.
[
   {
     "product": "Laptop",
      "price": 2000,
      "status":"PENDING"
     },
   {
   "product": "Mobile",
    "price": 1800,
    "status":"COMPLETED"
},
{
"product": "Mobile",
  "price": 1600,
  "status":"CANCELLED"
  }
]
Test the APIs on the Postman Tool
POST: http://localhost:8080/api/order/save-all
GET: http://localhost:8080/api/order/orders-by-status
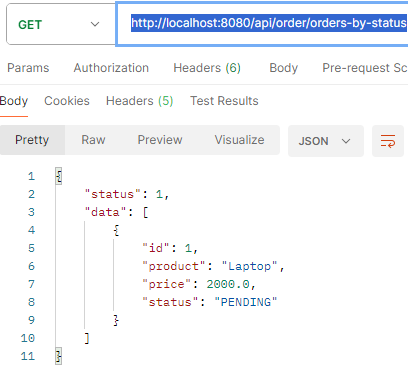
This API hits then Spring Data JPA (internally uses Hibernate as a JPA provider) generates SQL statement in the console below here:
Hibernate: SELECT * FROM orders WHERE status = ?GET: http://localhost:8080/api/order/orders-by-price-range
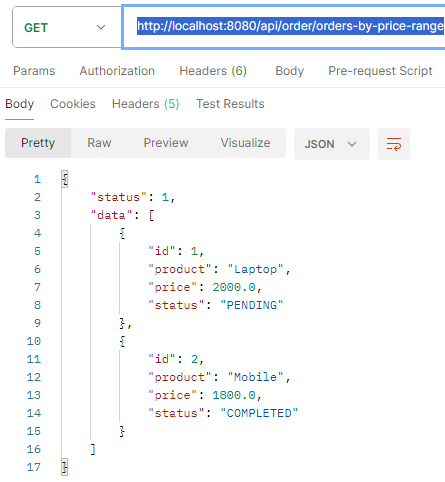
This API hits then Spring Data JPA (internally uses Hibernate as a JPA provider) generates SQL statement in the console below here:
Hibernate: SELECT * FROM orders WHERE price BETWEEN ? AND ?GET: http://localhost:8080/api/order/orders-dto-by-status
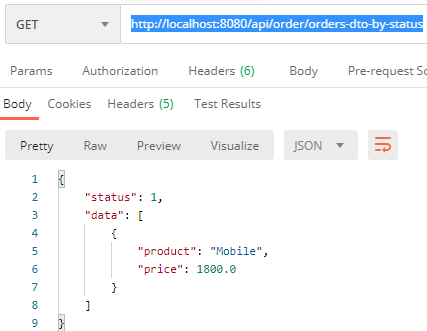
This API hits then Spring Data JPA (internally uses Hibernate as a JPA provider) generates SQL statement in the console below here:
Hibernate: SELECT product, price FROM orders WHERE status = ?Best Practices for @NamedNativeQuery
- Prefer JPQL unless a native SQL query is required for performance or functionality reasons.
- Test the queries thoroughly to ensure they work correctly with our database schema.
- Break down large or complex queries into manageable parts where possible.
- Always use placeholders (:param) to prevent SQL injection and ensure query reusability.
- Ensure indexed columns are used in WHERE clauses for better query performance.
Advantages of @NamedNativeQuery
- Reusability: Define once and use multiple times by name.
- Flexibility: Write complex SQL queries that cannot be expressed in JPQL.
- Mapping Control: Map results directly to entities or custom DTOs.
Conclusion
The @NamedNativeQuery annotation in JPA provides a powerful way to execute raw SQL queries while maintaining integration with our entity model. Whether we are retrieving data into entities or mapping it to custom DTOs, @NamedNativeQuery makes it easy to define and reuse native queries in our Spring Boot application. By following best practices, we can harness its full potential for efficient and flexible database operations.
Well I definitely enjoyed studying it. This article procured by you is very constructive for accurate planning.